NOTE: This review features Garmin Pilot prior to version 4.3. I have been tracking the updates as they happen and here are the major milestones (and associated discussion):
- Version 4.3: Terrain, Obstacles, and X-Plane Integration
- Version 5: User Interface changes, Lockheed martin flight plan filing, ICAO flight plans
The basic functionality of the app is still as cited below, but the look and feel has changed. Once you’ve read this review feel free to check the articles about the updates.
I can’t stand Apple devices. Their “walled garden” approach to apps might be good for security and stability, but when you start using that power to ban images of things that don’t fit your personal beliefs it goes a step too far. Censorship just isn’t my cup of tea. So when I started flying, I bought myself an Android tablet thinking that I’d use that for my Electronic Flight Bag and never have to worry about paper charts or pencil-and-E6B trip planning again. Little did I know that while Apple devices have a smattering of brilliant apps for that specific purpose, Android devices have been pretty much ignored. It took me a while, but with Garmin Pilot I think I finally have an app I can live with.
First, a note about legality. As set out in the FAA’s Advisory Circular 91-78, as the Pilot In Command of an aircraft flying under Part 91 conditions (not for hire) I can do pretty much whatever I want when it comes to whatever Electronic Flight Bag I choose. To use an old saying, I can certify a ham sandwich to be my EFB if I wanted. But that doesn’t mean that any old system is good enough for regular use. The FAA recommends testing your equipment and ensuring that it actually works before using it in flight, and it took some trial and error to get to that point for me.
I started with some of the “free” apps, and none of them really cut the mustard. Then I tried FlightPro, and while it worked it wasn’t ideal (plus they seem to have some growing pains). Then I found Garmin Pilot (hereafter often referred to as GP), and there were some nifty features that really checked all the boxes in terms of what I was looking for in an EFB.
One of the key items of an EFB is that it provides all the charts you need, and keeps them up to date. GP provides all of that — sectionals, IFR Low/High, and even approach plates.
On the app, charts are seamless. Sectionals flow straight from one to the other without any issues. Ever since the FAA started releasing the charts as bitmaps instead of scanned versions of the sectionals the quality has improved remarkably, and it looks like Garmin put a little extra TLC making sure everything was perfectly aligned. Switching from one type of chart to another is as easy as two clicks on the screen, and readily done even in the bouncing cockpit of a 172 on a summer day.
The charts are spliced together to provide a seamless viewing experience that flows from one chart to another, and unlike other EFB apps the charts are displayed properly and not stretched out.

Something that’s really nifty is the geo-referenced approach plates. I’ve been working on my instrument rating, and being able to see my exact position on the chart has really helped me keep my situational awareness and figure out how to shoot approaches. It isn’t precise enough to use as anything other than “situational awareness,” but every little bit absolutely helps. The ability to enlarge the plate for easier reading is another wonderful benefit that you don’t get with paper charts. (Note: geo-referencing is extra, but the charts are included in the standard package)
Oh, and you don’t need to buy the new ones every cycle anymore. They just get automatically updated whenever the new charts come out. The initial subscription is about $75, but considering that you get every single chart the FAA produces for a full year that’s a steal.
The NACO / FAA charts are cool, but you probably won’t spend much time looking at them. There’s something better in GP. Not only do you get the standard charts (sectionals, IFR low / high) but you also get a nifty proprietary vector version of the charts where you can show or hide information as you desire. Don’t care about NDBs? Hide them! Don’t want to know about fields without services? Poof! Only want to see intersections if you zoom to a certain level? No problem! It’s a great way to display information, and extremely useful.
There’s a problem, though: the Garmin chart is a CPU hog. I used this app on both a Nexus 7 (2013) and a Nexus 9, and on the 7 the Garmin chart was pretty much useless. You’d swipe it a little to one side, and five minutes later everything would be re-drawn. This seems to have been fixed with recent updates (especially since version 4.3), but it’s still something to consider if you’re trying to run it on an older device.
I do have a complaint about the Garmin Pilot chart availability though, namely that while they have TAC charts there are apparently no helicopter charts available. For someone heading to New York shortly that’s a problem.
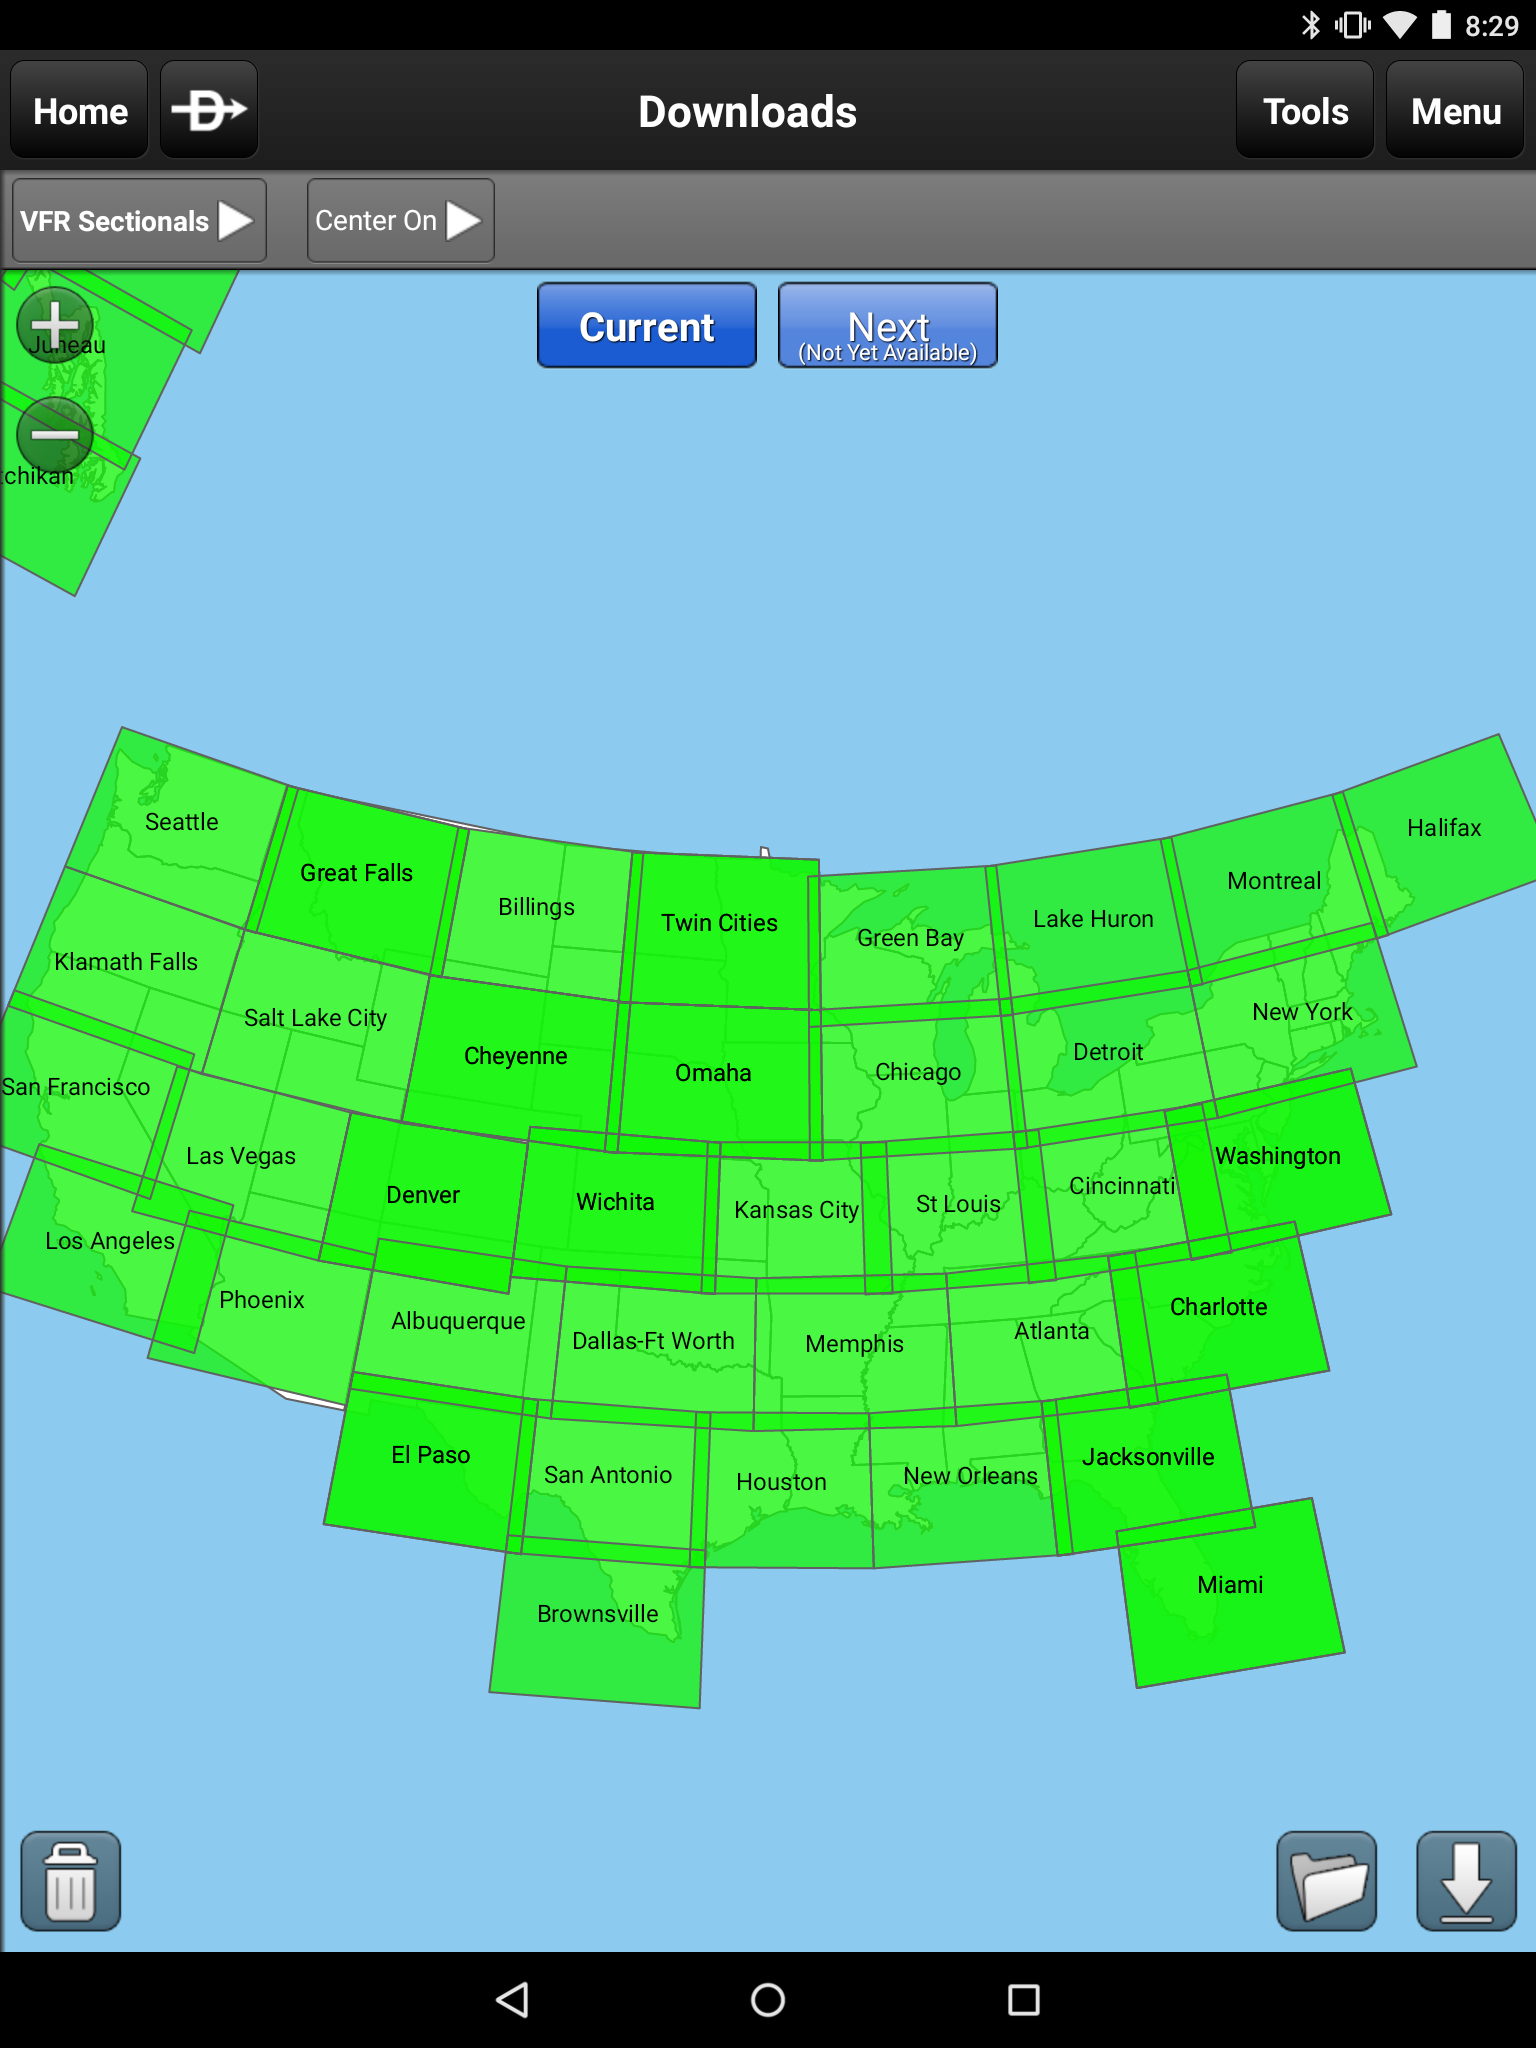
Downloading the charts is a snap. On the aptly named “Downloads” tab there’s a list of all the available charts, and clicking on each chart type takes you to a screen much like this one. You’re presented with a map of the United States, and you can visually identify which charts you want to download for your specific operations. Or, if you’re like me, you can just mash the “Download All” button and get everything. The total size for the complete download of everything is about 14 GB, but easily fits on a Nexus 7 or Nexus 9.
Charts aren’t free though — you need to pay a subscription. For just the FAA charts, instrument procedure charts, AOPA airport database, and the Garmin Pilot display, the subscription fee as of the time of writing is $9.99 per month or $74.99 per year. That’s pretty much everything you need to go be a VFR pilot. It doesn’t, however, include geo-referencing of IFR approaches — a $49.99/year add-on if you want to see your position on the approach plates.
[UPDATE] Since the latest revision, they have updated the pricing model. The standard package is still $74.99, but the add-ons have changed. The VFR package includes SafeTaxi and the new terrain and obstacles database, and can be yours for the low price of $49.99 a year. Or you could get the IFR package, which has all of the above plus geo-referenced IFR plates for $74.99 a year (plus the original $74.99 for just the app and the charts).
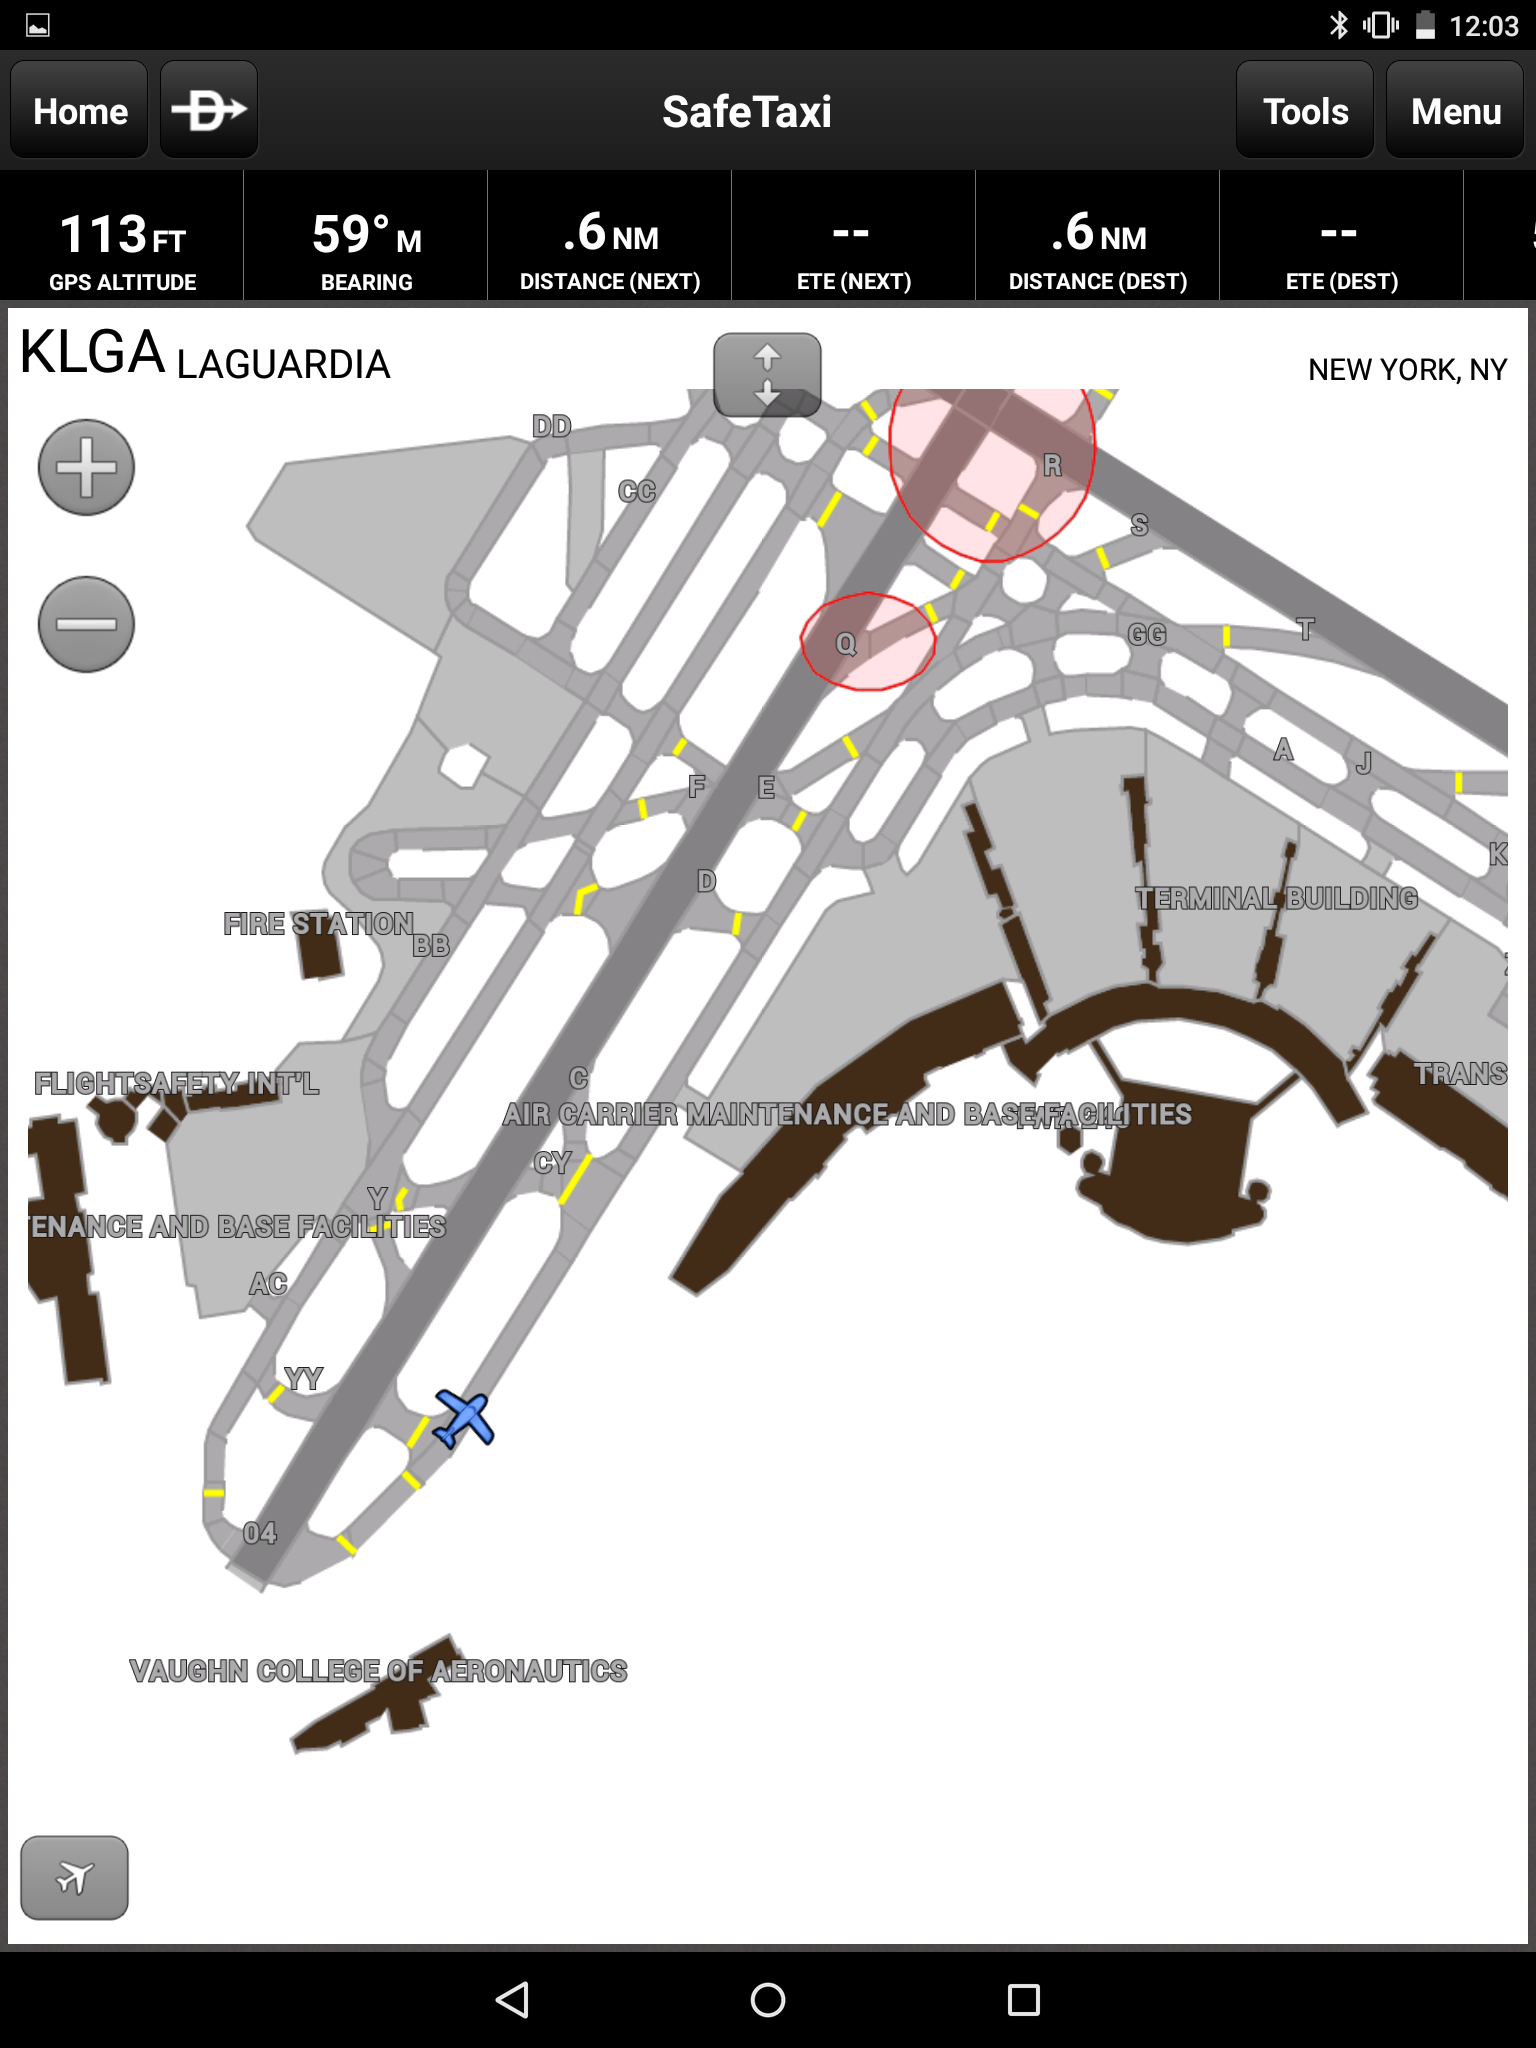
The SafeTaxi, however, might be worth it. The system plots your position on the ground as you taxi around the airport, and identifies taxiways by name as well as runways and other points of interest (like FBOs). When I flew down to Corpus Christie a few weeks back it came in handy, as I had never been to that airport and had no idea where the specific FBO in question was located. SafeTaxi pointed it out, and I was able to follow the controller’s instructions on how to get there by looking at the taxiway markings on the app. Or, if you like doing things the old fashioned way, you can pull up the airport diagram for the airfield and follow along that way. I suppose.
Another useful feature: SafeTaxi automatically makes itself scarce when not needed. There’s an option you can set to have SafeTaxi appear when your airspeed drops below 40 knots at your destination, and disappear when you accelerate past that point again. It’s one less thing to worry about, and I approve.
So Garmin Pilot is pretty slick for reference, but how good is it for flight planning?
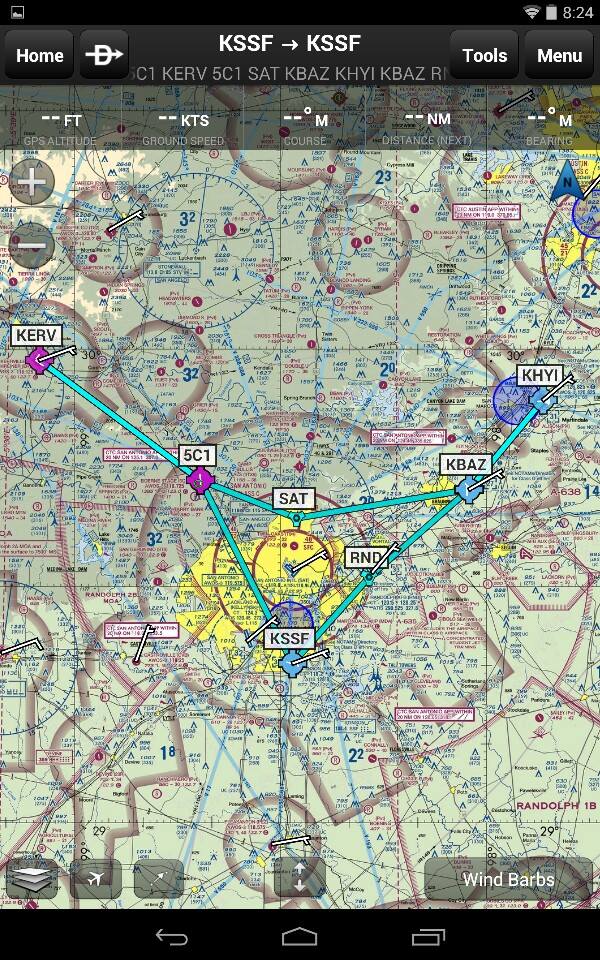
Figuring out a flight plan takes time, but when you can touch and drag your flight path around and graphically edit it on the fly things get pretty simple. Garmin Pilot has two ways to enter a flight plan, a formal method and an informal method. We’ll get to the formal method in a second, but the informal entry is nifty.
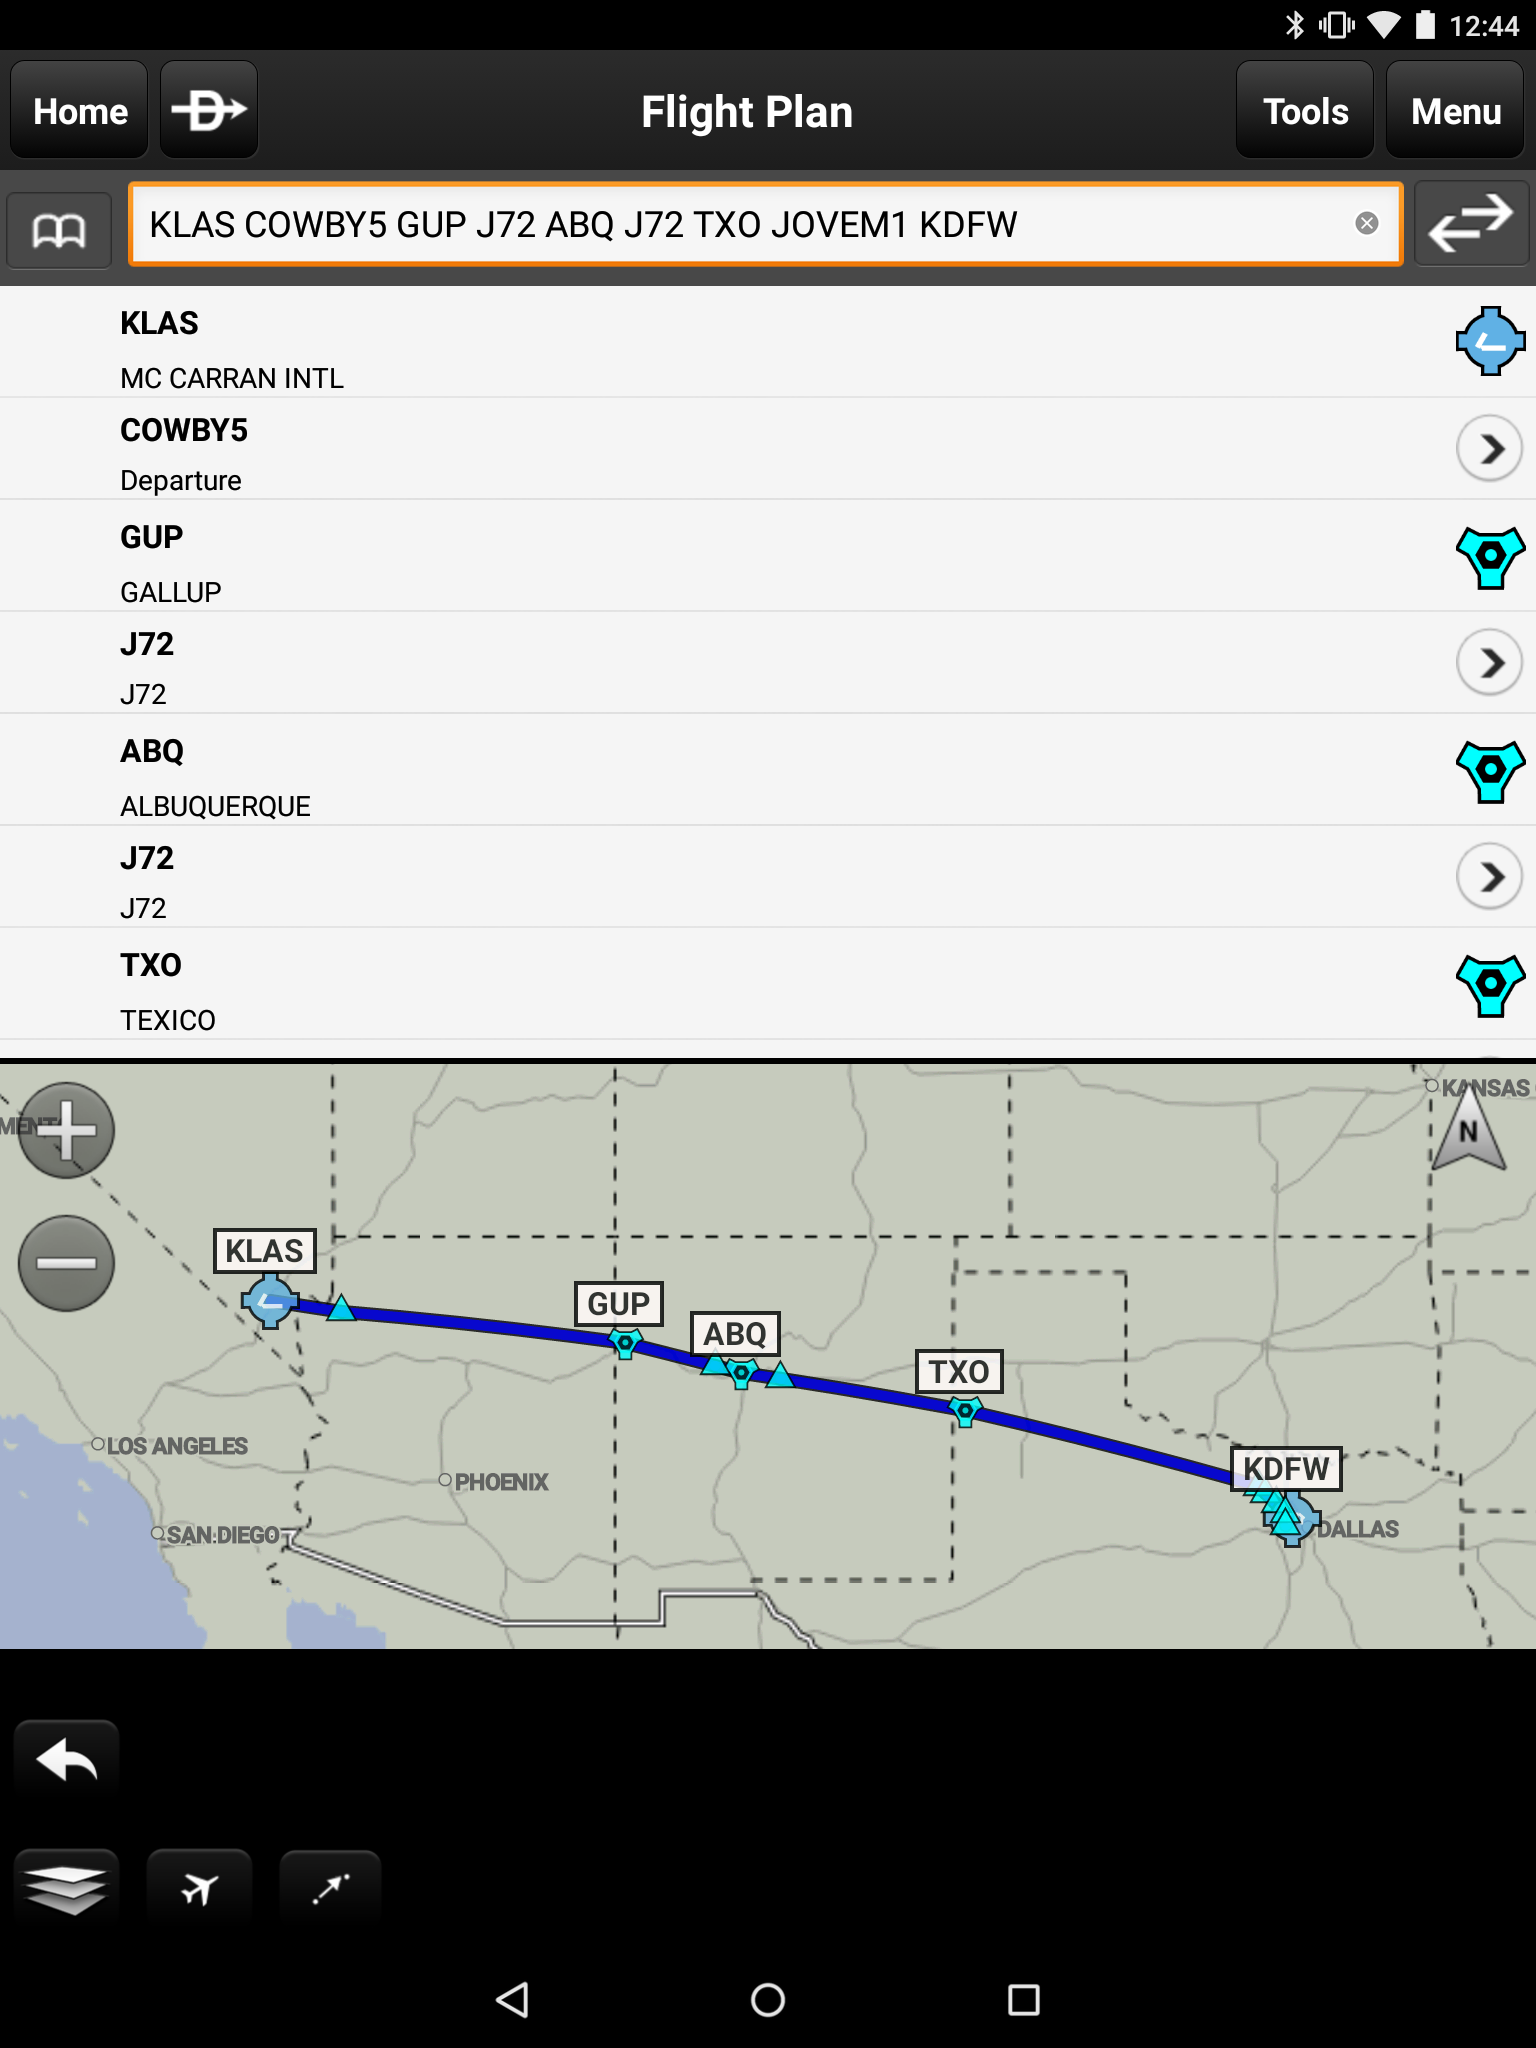
On the “flight plan” page, you can enter your proposed flight plan and see it appear on the map below. Garmin Pilot understands all the usual flight plan related syntax, from airways to arrival and departure procedures, and will duly plot them on the screen as well as yell at you if you entered something wrong (like a wrong entry point for an airway or a nonexistent arrival procedure). For when you’re doing your initial planning, you can even edit this path manually by pressing on the point you want to move and dragging it to where you want it to be. GP will give you an option of tagging that to a GPS coordinate or selecting a nearby navigation point, like an intersection or airport. When you’re still not sure about where you want to fly, it makes selecting a route much easier.
Once you find a path you like, you can save it in the device’s memory. The little book icon to the left of the text based flight plan lets you store and retrieve flight plans, so if you have one you do a lot you can save it there and call it up whenever needed.
I love it when machines do all the hard math stuff for you.
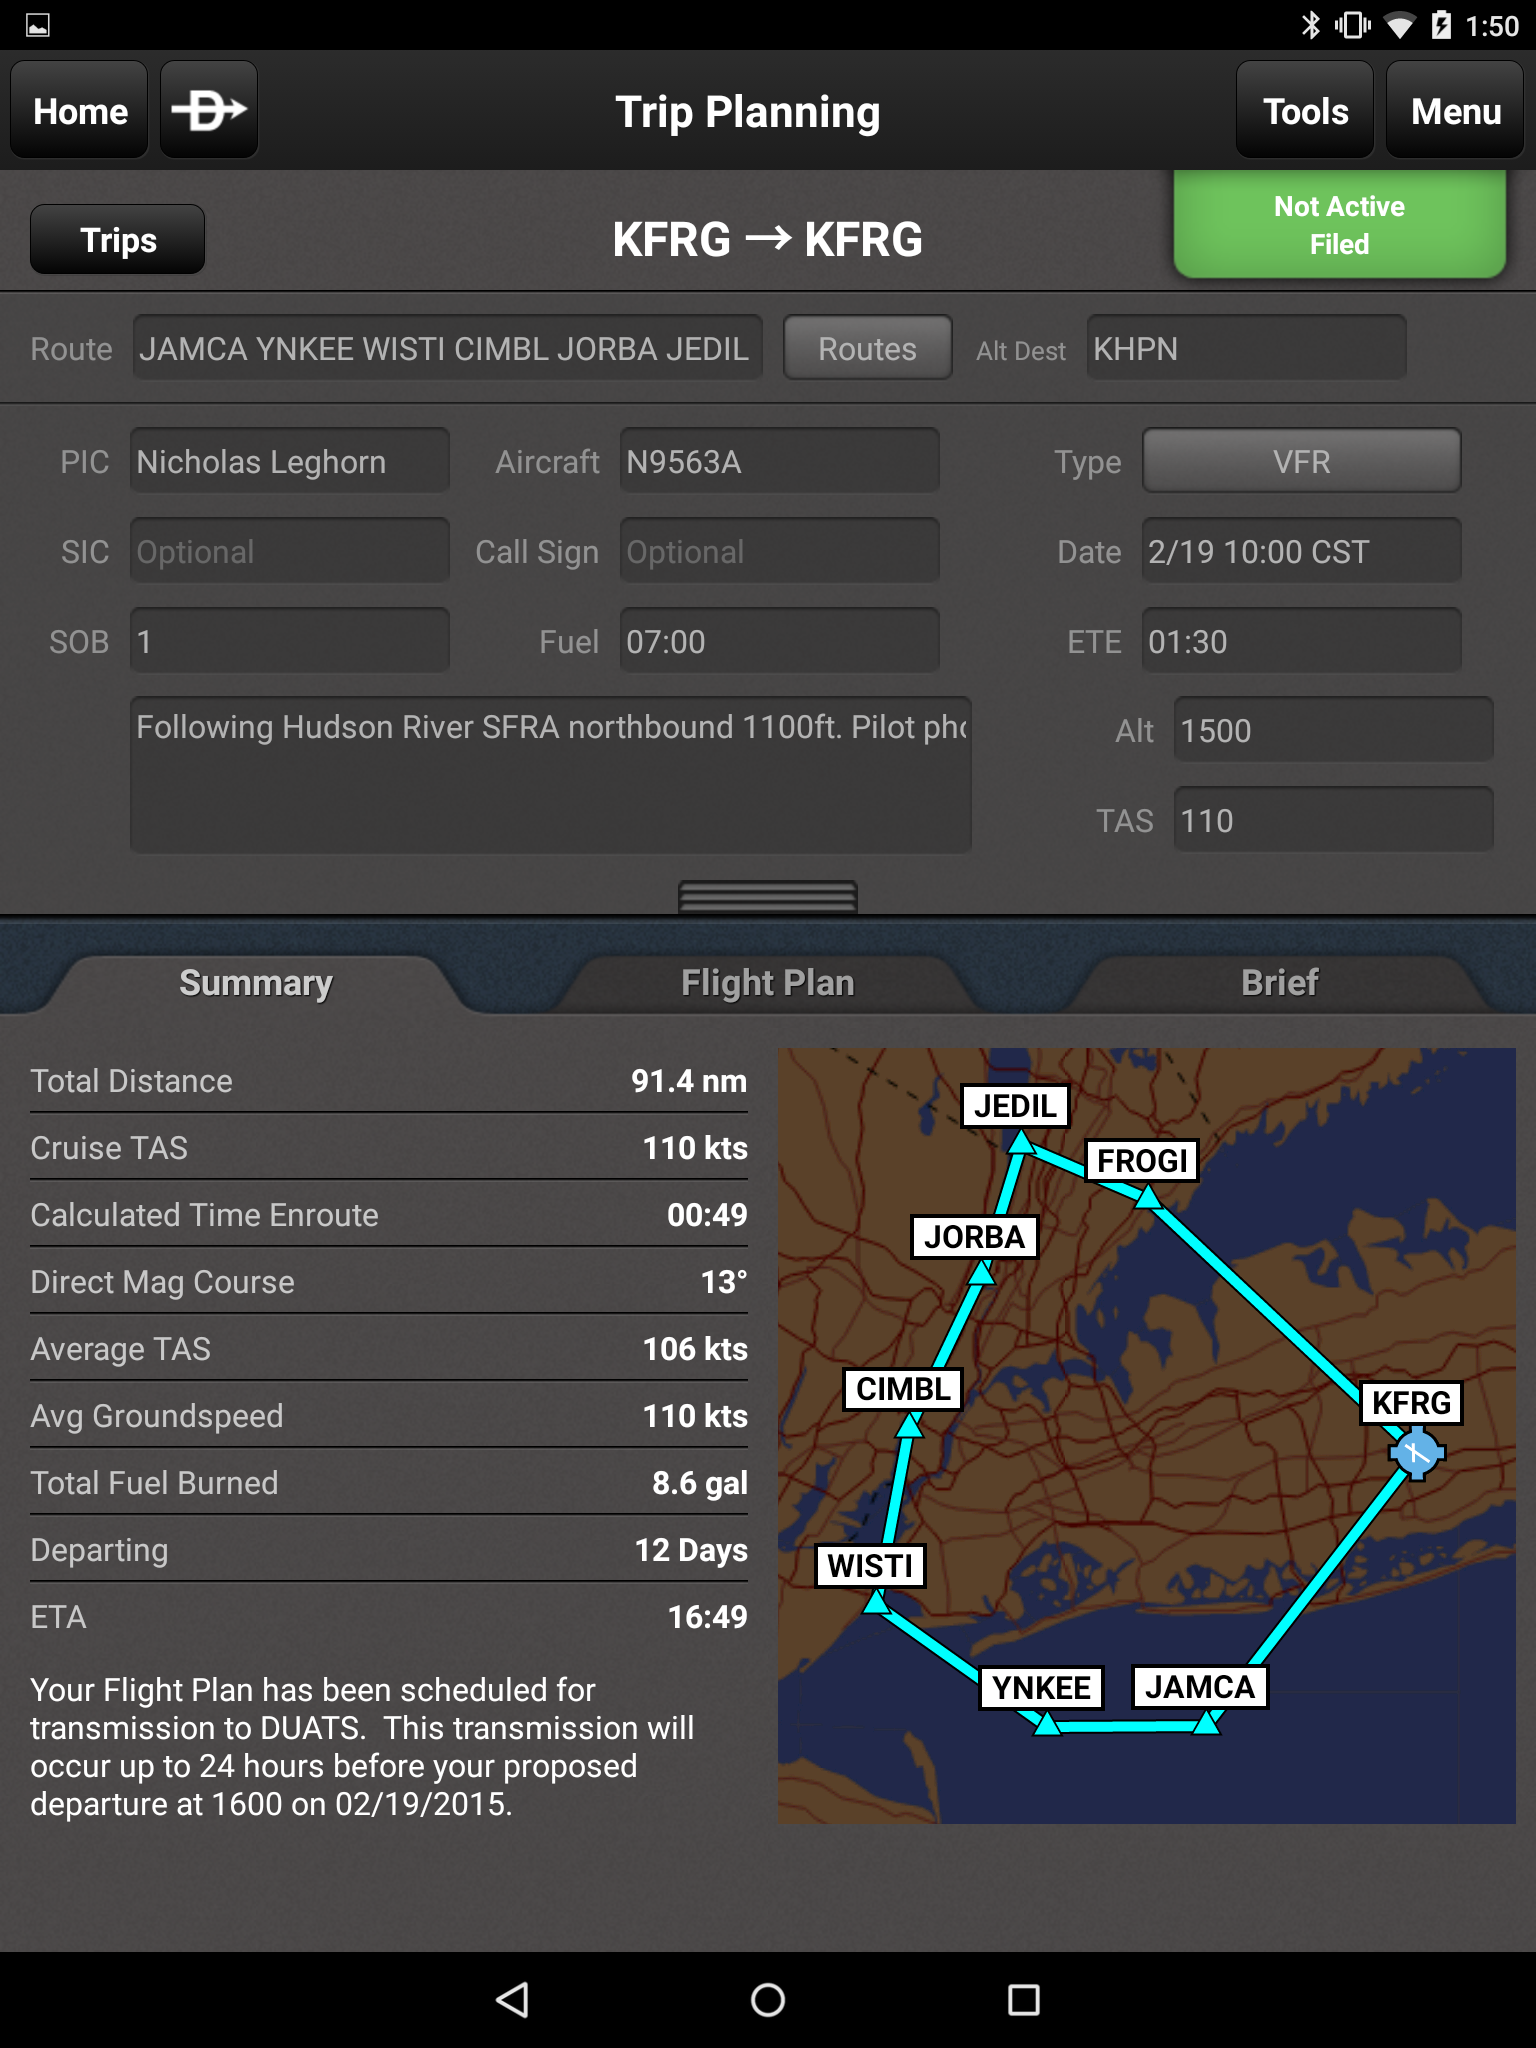
With the Flight Planning section in GP (the more “formal” flight planning area), you can fill out your flight plan information and the app will figure out the details. You can program multiple different airplane profiles, from a pokey 172 to a sleek Cessna Citation, and the app will use the current weather conditions along your route (when connected to the internet) to estimate your time en route, fuel burn, and other vital metrics. The little map also gives you some of that same click-and-drag flight path changing capabilities, but it isn’t as easy to use (and actually gets in the way sometimes). If you click around, there’s even more on tap.
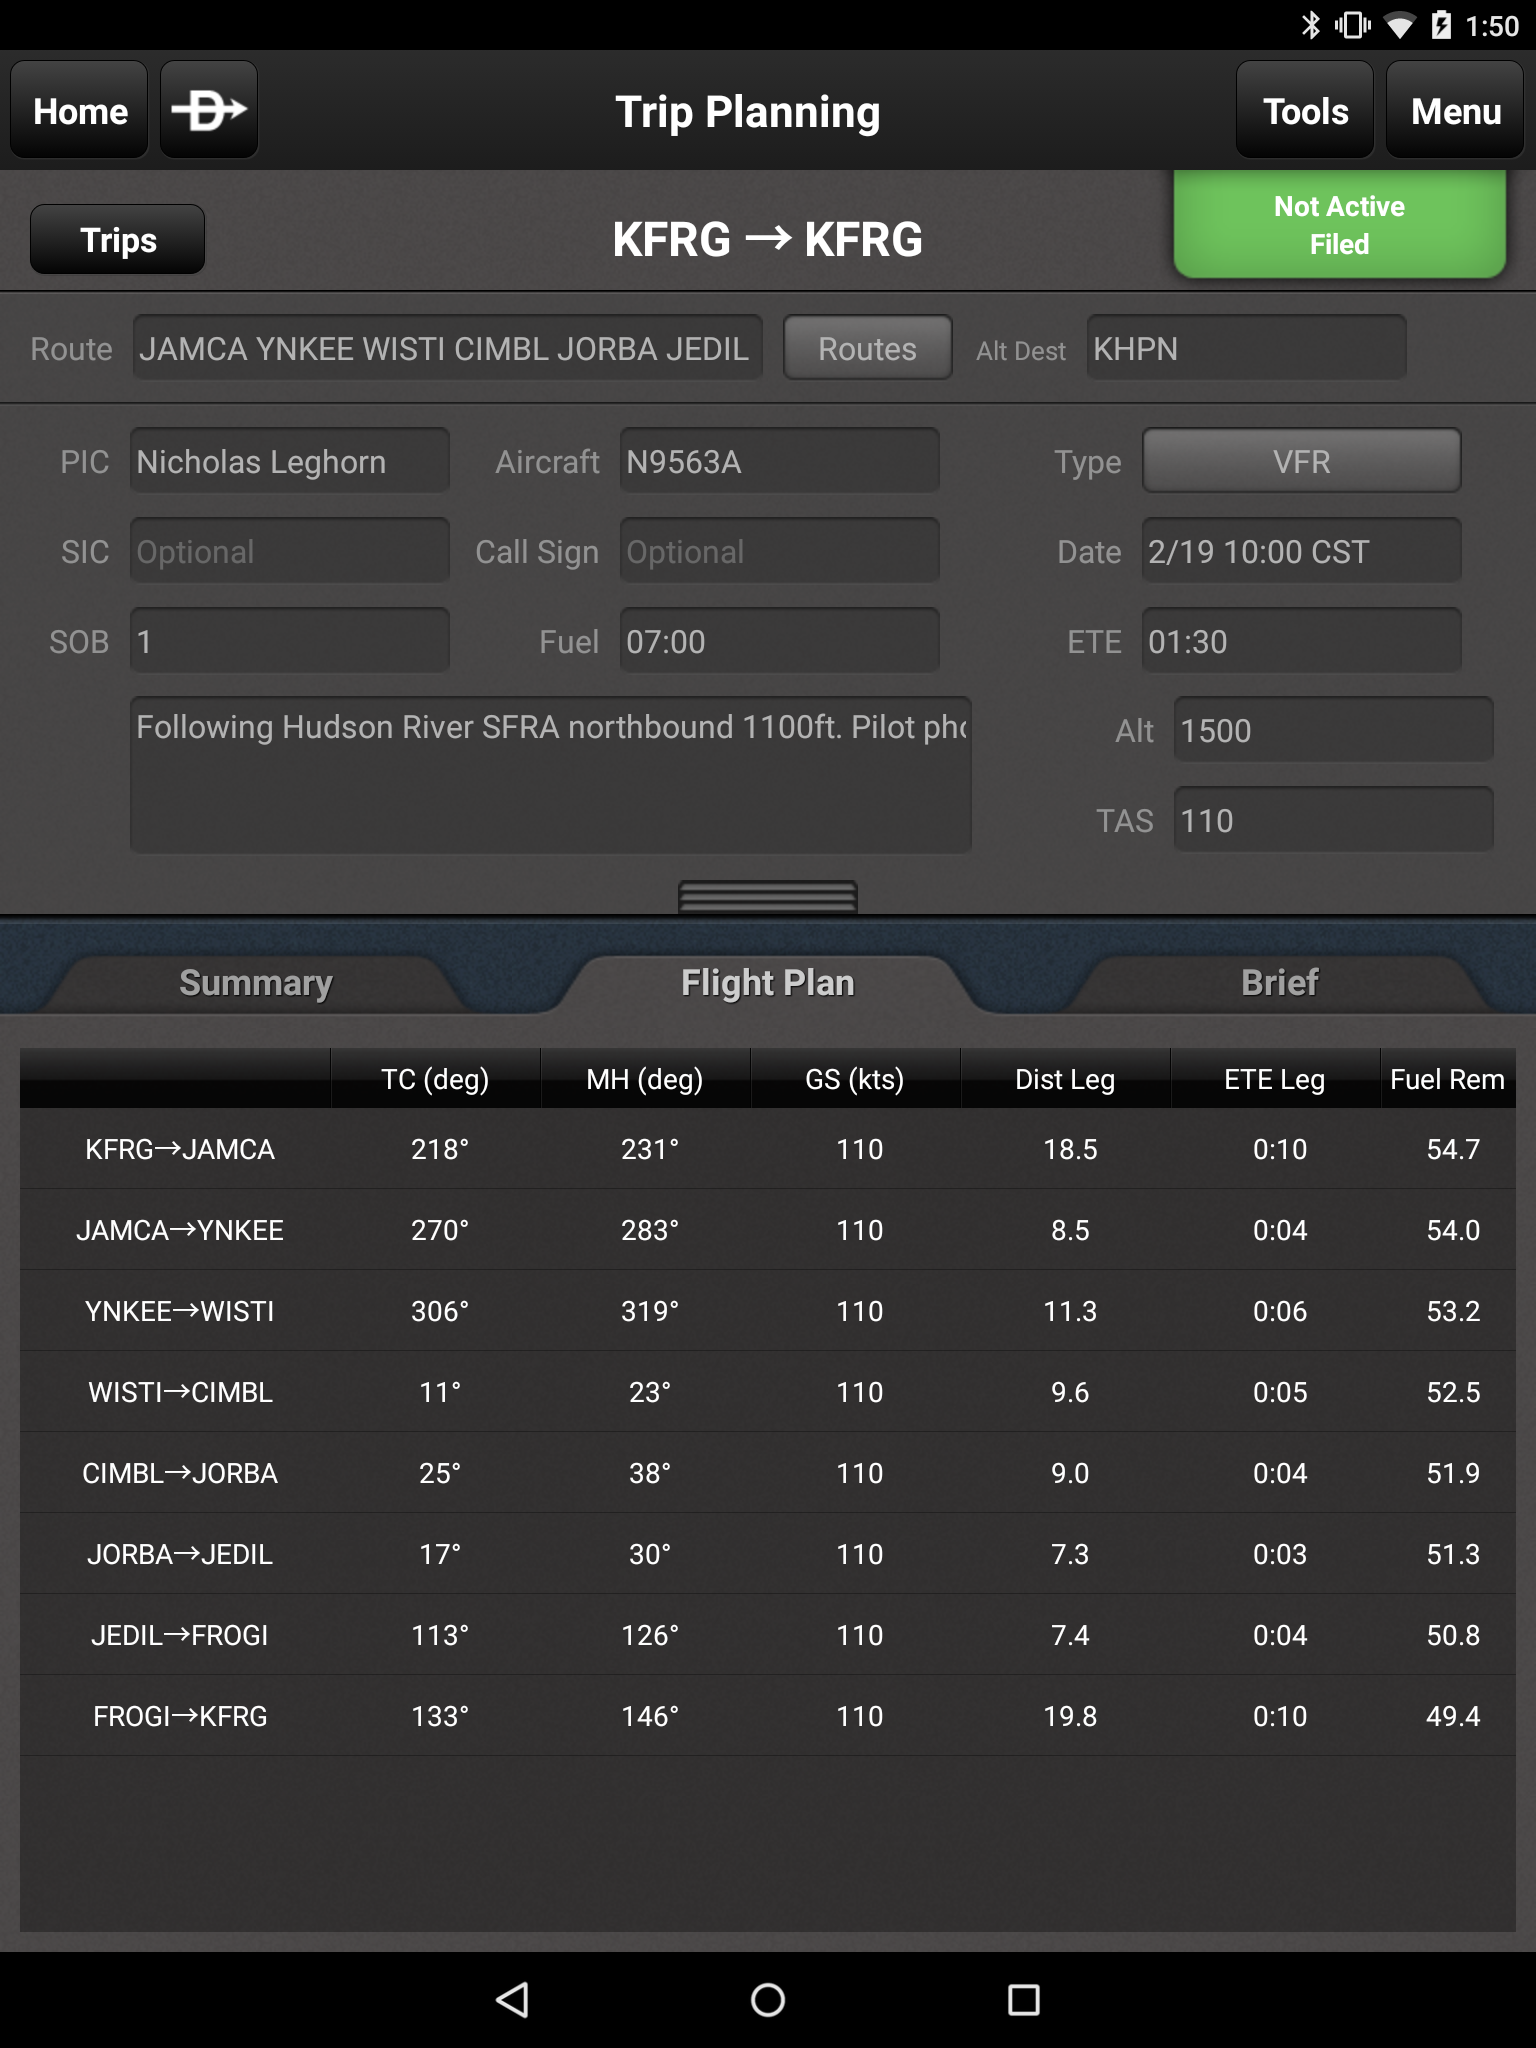
I told you the thing does all the math. Tab #1 is an overview of your route with the major items summarized, like total fuel burn, time en route, and so on. Tab #2 is a complete readout of everything you could possibly want for flight planning, including magnetic heading for each leg (already correcting for forecast winds aloft), estimated ground speed, fuel burn, and more. If you had a big enough display you could see more items, but even on the smaller displays you can choose what you want to see by tapping on the headings for the columns (they will give you a drop down menu for available metrics).
Tab #3 gives you a complete weather briefing — if you entered your DUATS or DTC credentials in the pilot configuration page, that is, and are connected to the internet. The thing is nifty, but not yet magic. When you request the briefing, Garmin Pilot uses your credentials to log you in and gets you an “official” weather briefing (in other words, the FAA knows you got it if there’s ever a question). Once in hand (or not, if you skip that step) you can then file your flight plan straight from the app. Be careful, though — hitting the “file” button is easier than you’d think and I’ve done it on accident once or twice. Just keep your finger off the trigger until you’re ready to fire, so to speak.
And when you’re ready to fly your flight plan, hit “activate” in the drop down menu from that green box and it will automatically activate it for the moving map.
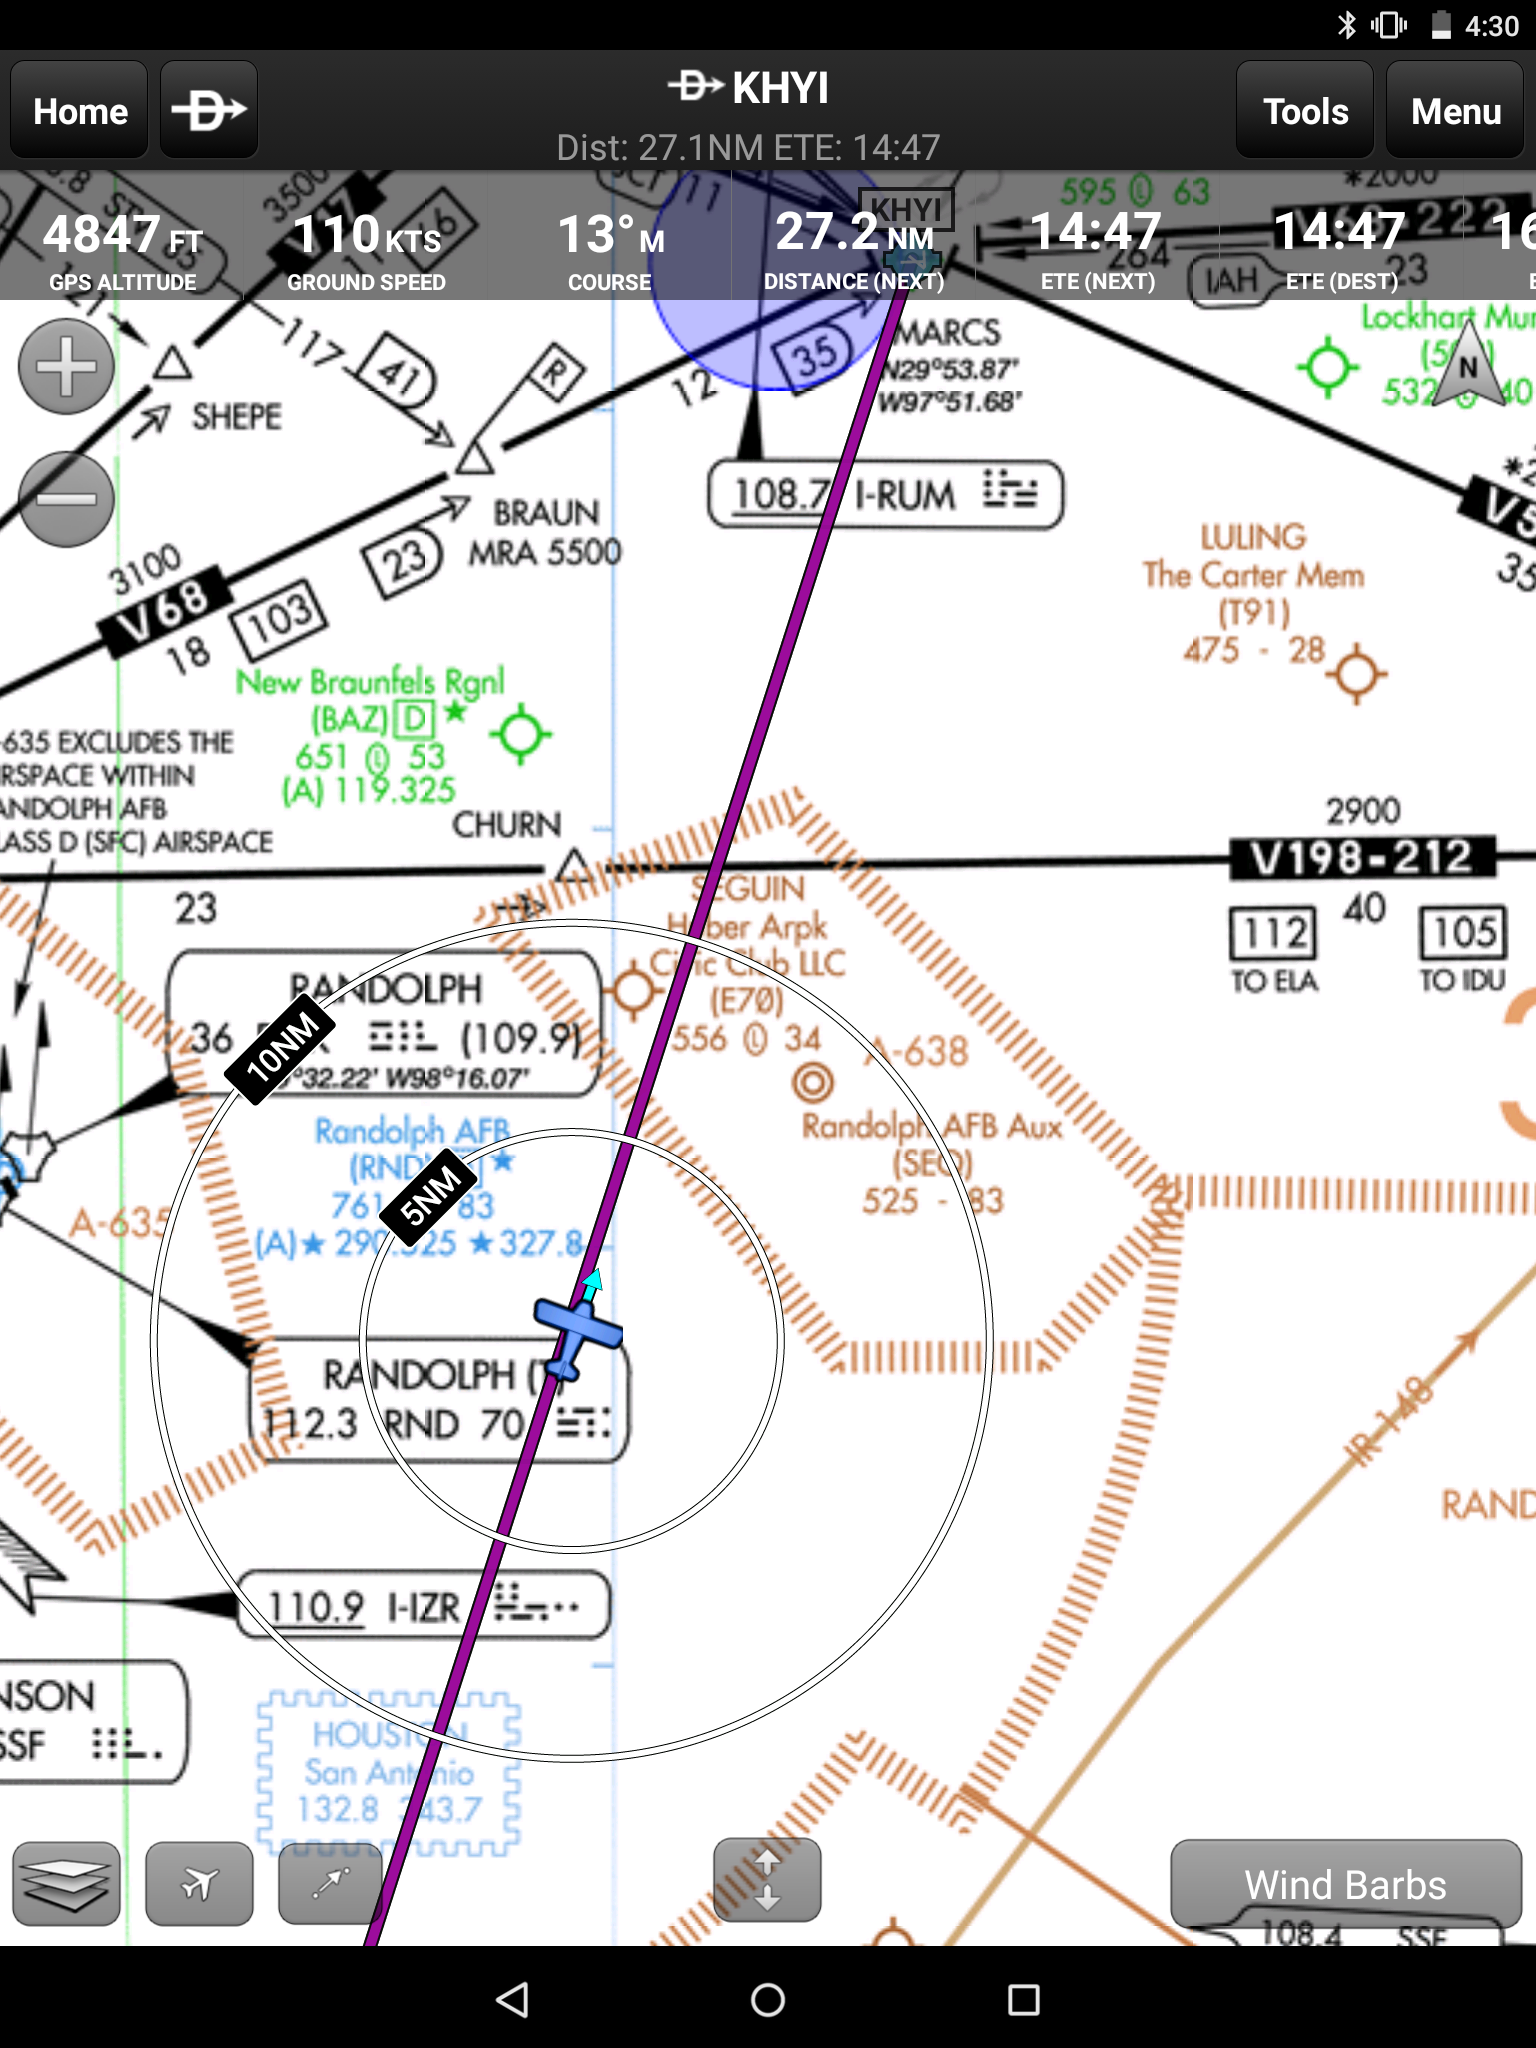
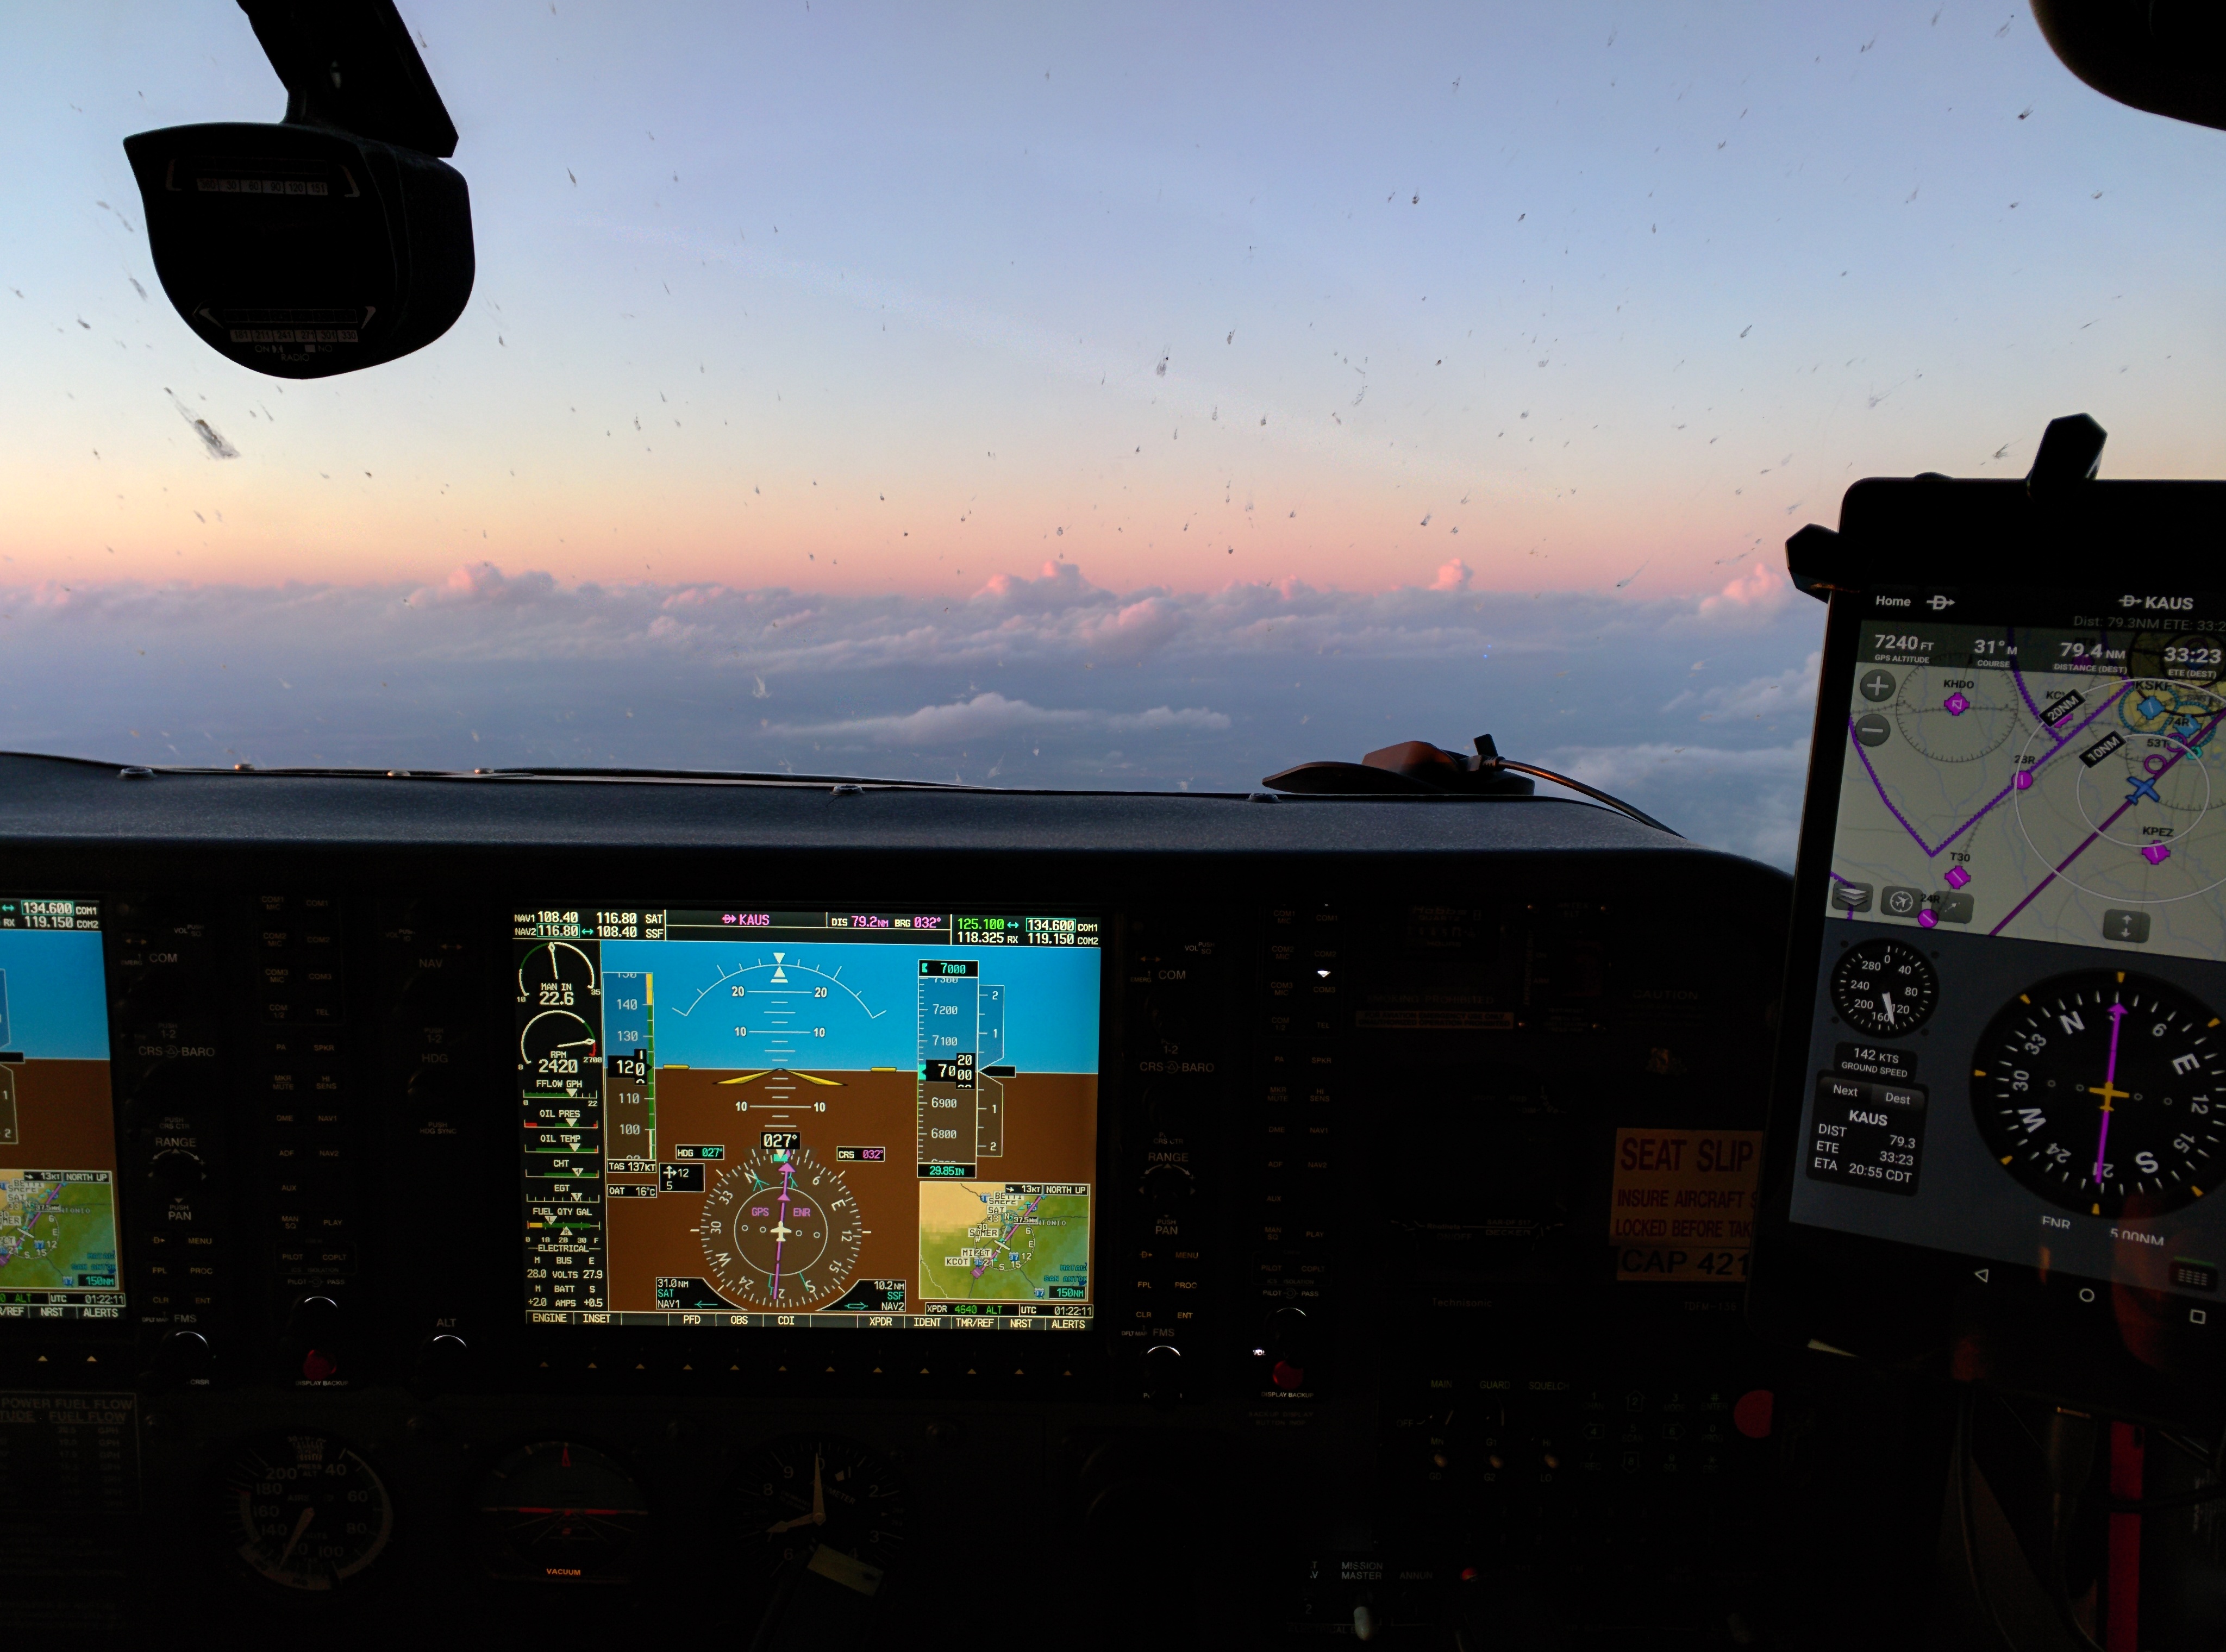
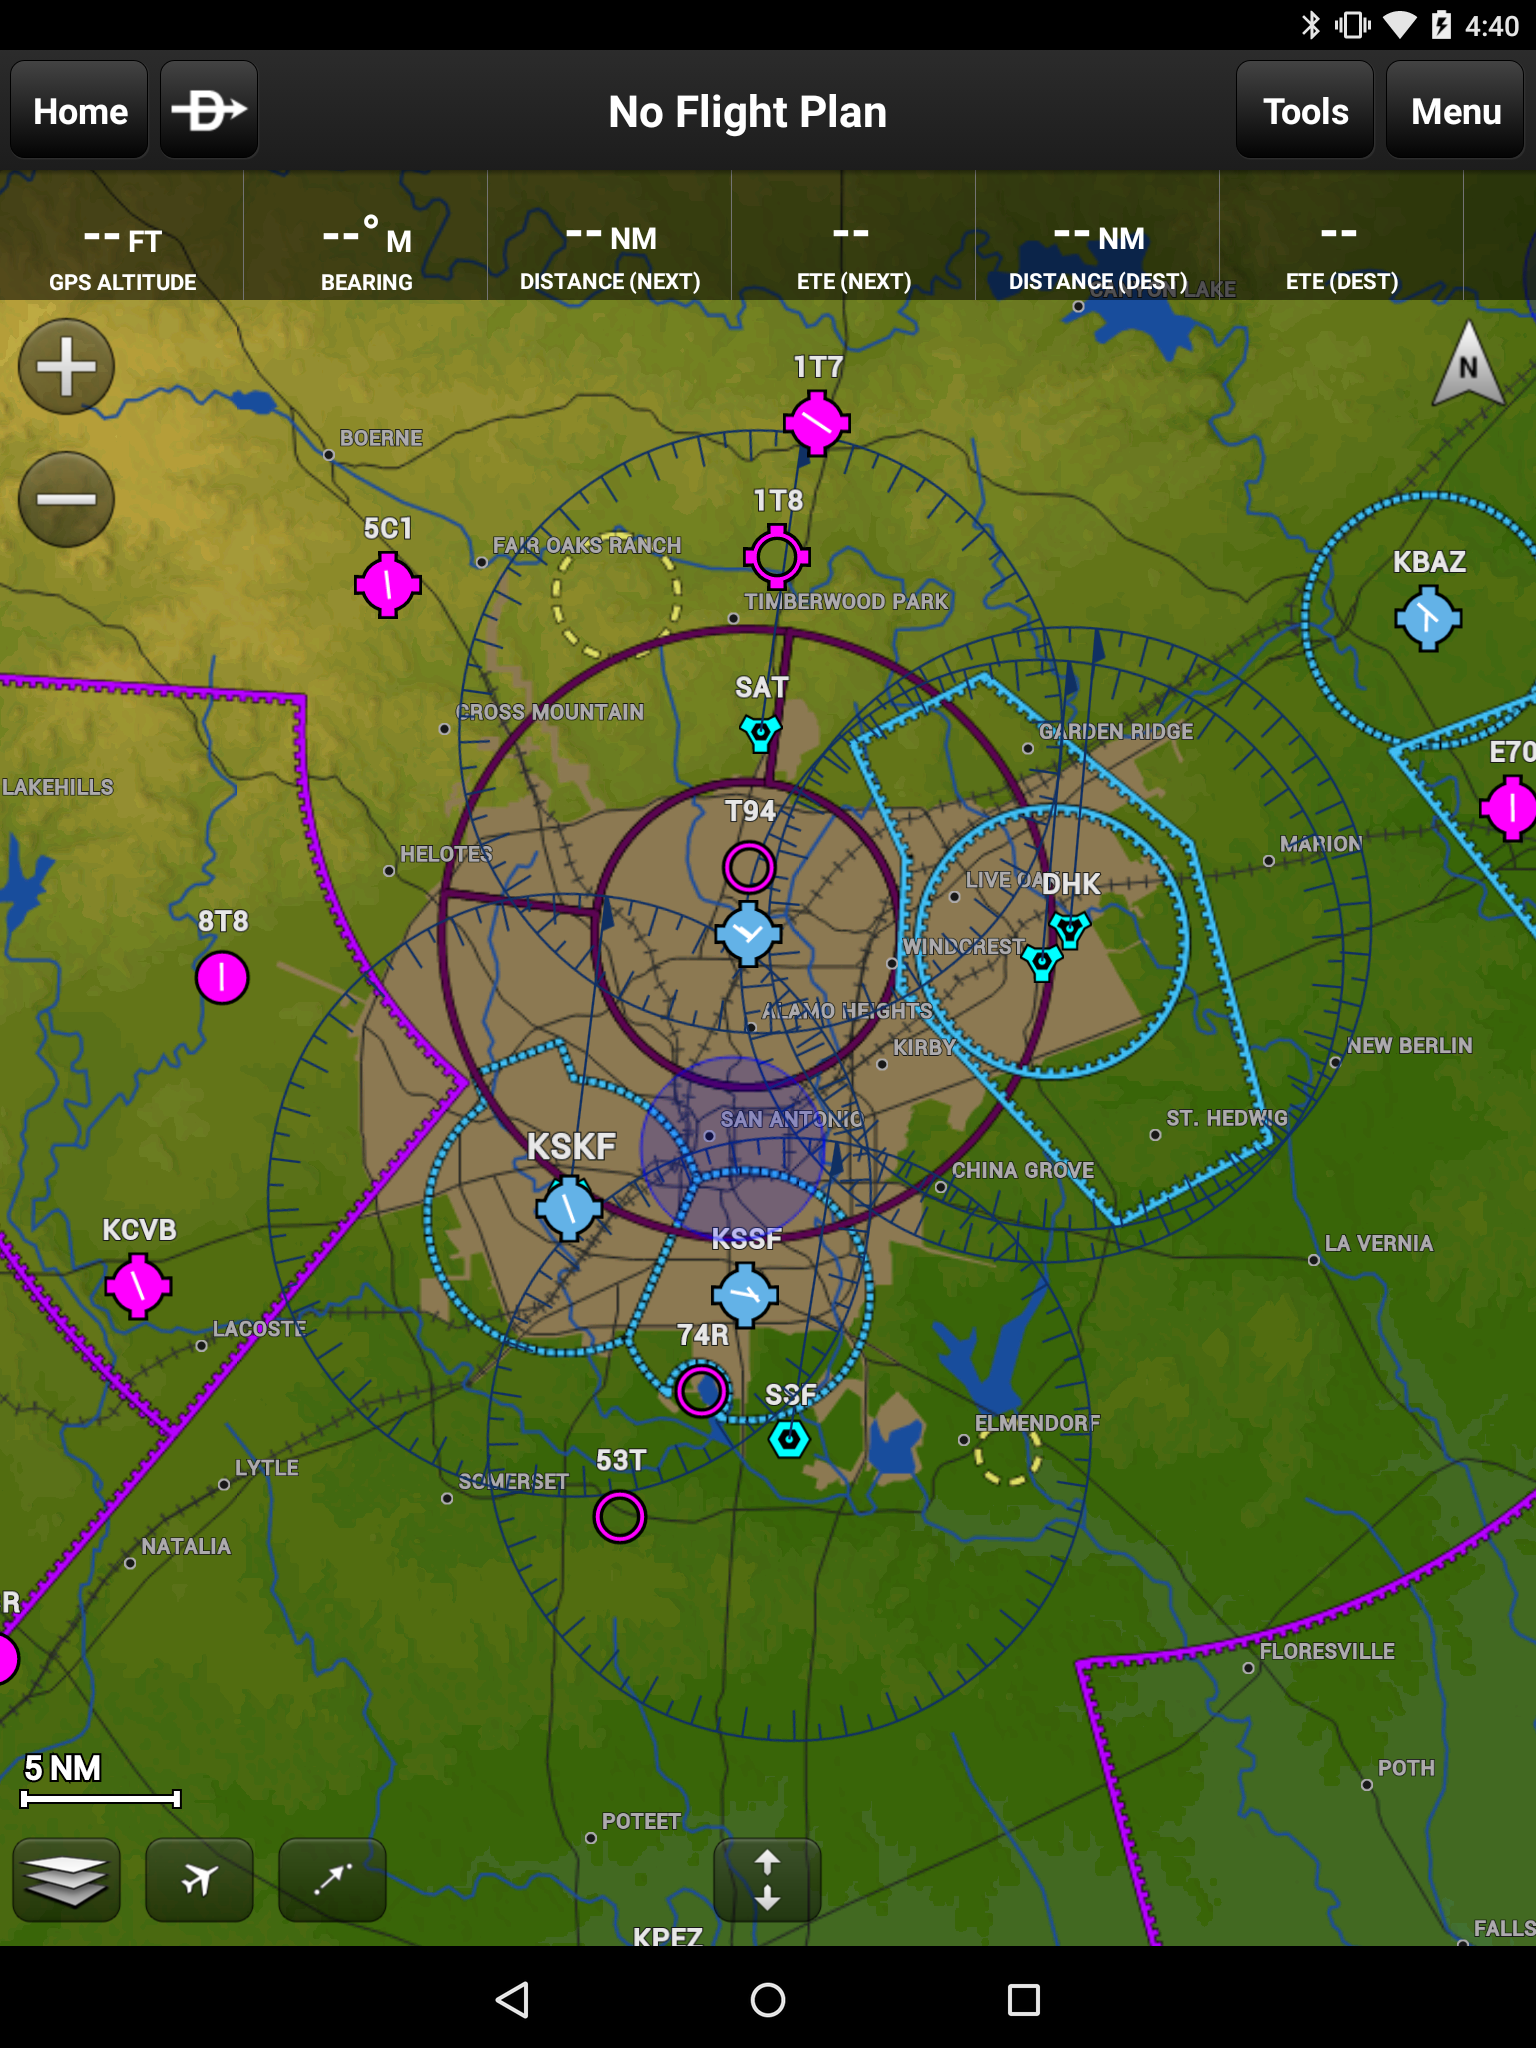
Once off the ground, you’re spoiled for choice when it comes to ways to display your current position. The initial configuration simply displays your location with either a blue dot (if you’re not moving) or a small airplane of your choice. I have mine configured to also give me two rings around the airplane, one at 5 nautical miles and another at 10 so I can judge what’s around me. With a flight plan entered in the app, your position is noted relative to that path and the currently active leg (the one you’re closest to) is highlighted in magenta.
By default, the map doesn’t move with the airplane. Hitting the little grey box with an airplane symbol fixes your location in the center of the screen and moves the map around it. It also uses a “north up” display mode by default, but pressing the compass will switch to a view that instead keeps the nose of the airplane pointed at the top of the screen and swivels the map to suit the conditions.
Along the top of the screen are a number of configurable readouts. You can have the app compute anything you want really, from actual altitude to cross-track error and even expected time of arrival given the current wind conditions. Selecting what you want displayed is as simple as giving the box a tap and choosing from a drop-down menu.
You may have noticed a little arrow icon at the bottom of the screen. This funny little guy is very important, as he engages one of the more beneficial features of the app.
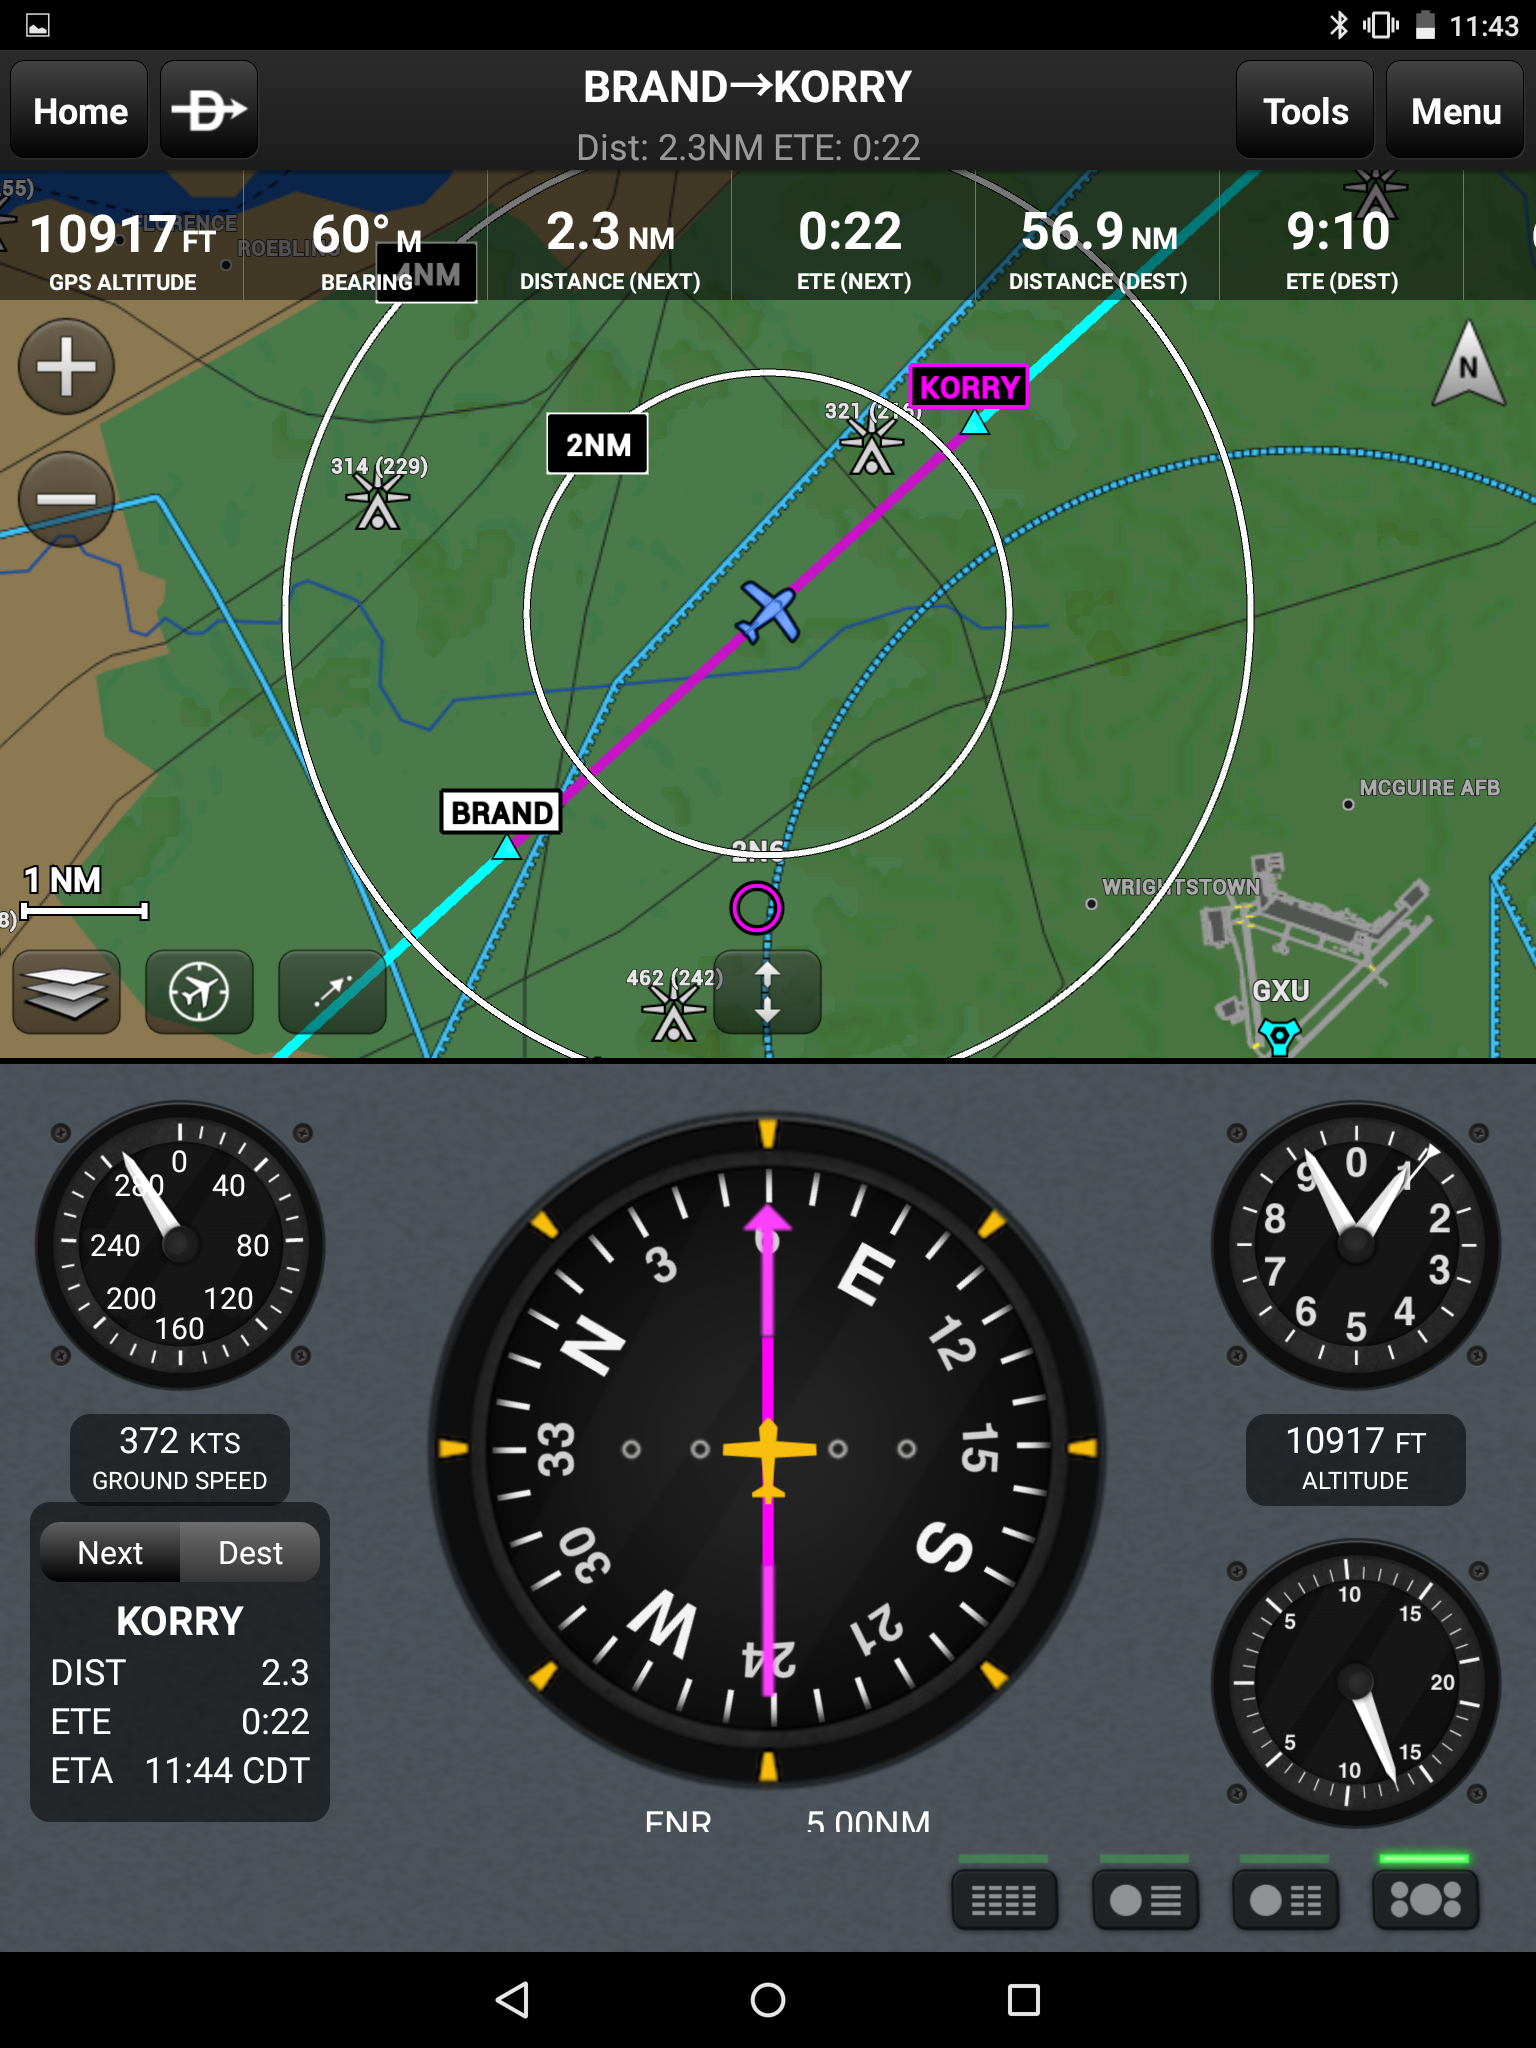
In this main map mode, there’s the option to have a “split screen” display. So while you maintain situational awareness with your moving map at the top of the page, you can fiddle with all sorts of information at the bottom. You can pull up approach plates for your destination airport to look ahead and see what you need to do to actually land the damned thing. You can configure a set of widgets that will give you things like METARs and PIREPs along your route as you fly, which I have never found actually useful. You can set SafeTaxi to use that space. Or, like I do, you can configure a set of GPS-based instruments to inform you about how your airplane is performing.
The nicest thing that this display does is that it gives you a proper HSI. As someone who has flown steam gauge Cessna 172 aircraft their entire flying life, having something other than that swinging dowsing rod of a VOR indicator is very much appreciated. Especially when you can simultaneously see your position relative to your intended track. It makes flying a snap.
There’s a catch, though: these instruments are 100% GPS based. Which means they lag like you wouldn’t believe. Not good at all for controlling the aircraft, but perfect for monitoring your progress. There’s apparently a fix for that if you buy an $800 gadget from Garmin that houses a laser-ring gyro as well as an ADS-B antenna and remote GPS receiver, and that setup will turn your HSI into a true blue functioning artificial horizon. I’ve seen it work and it does work, but its way too expensive for me to blow money on for the marginal improvement.
Of all the pages in Garmin Pilot, this is probably the one you’ll see the most. I think its laid out in an extremely logical manner, and while it is a tad cluttered it gives you everything you need in one quick glance. And if there’s something you don’t like, you can change it to suit your mission.
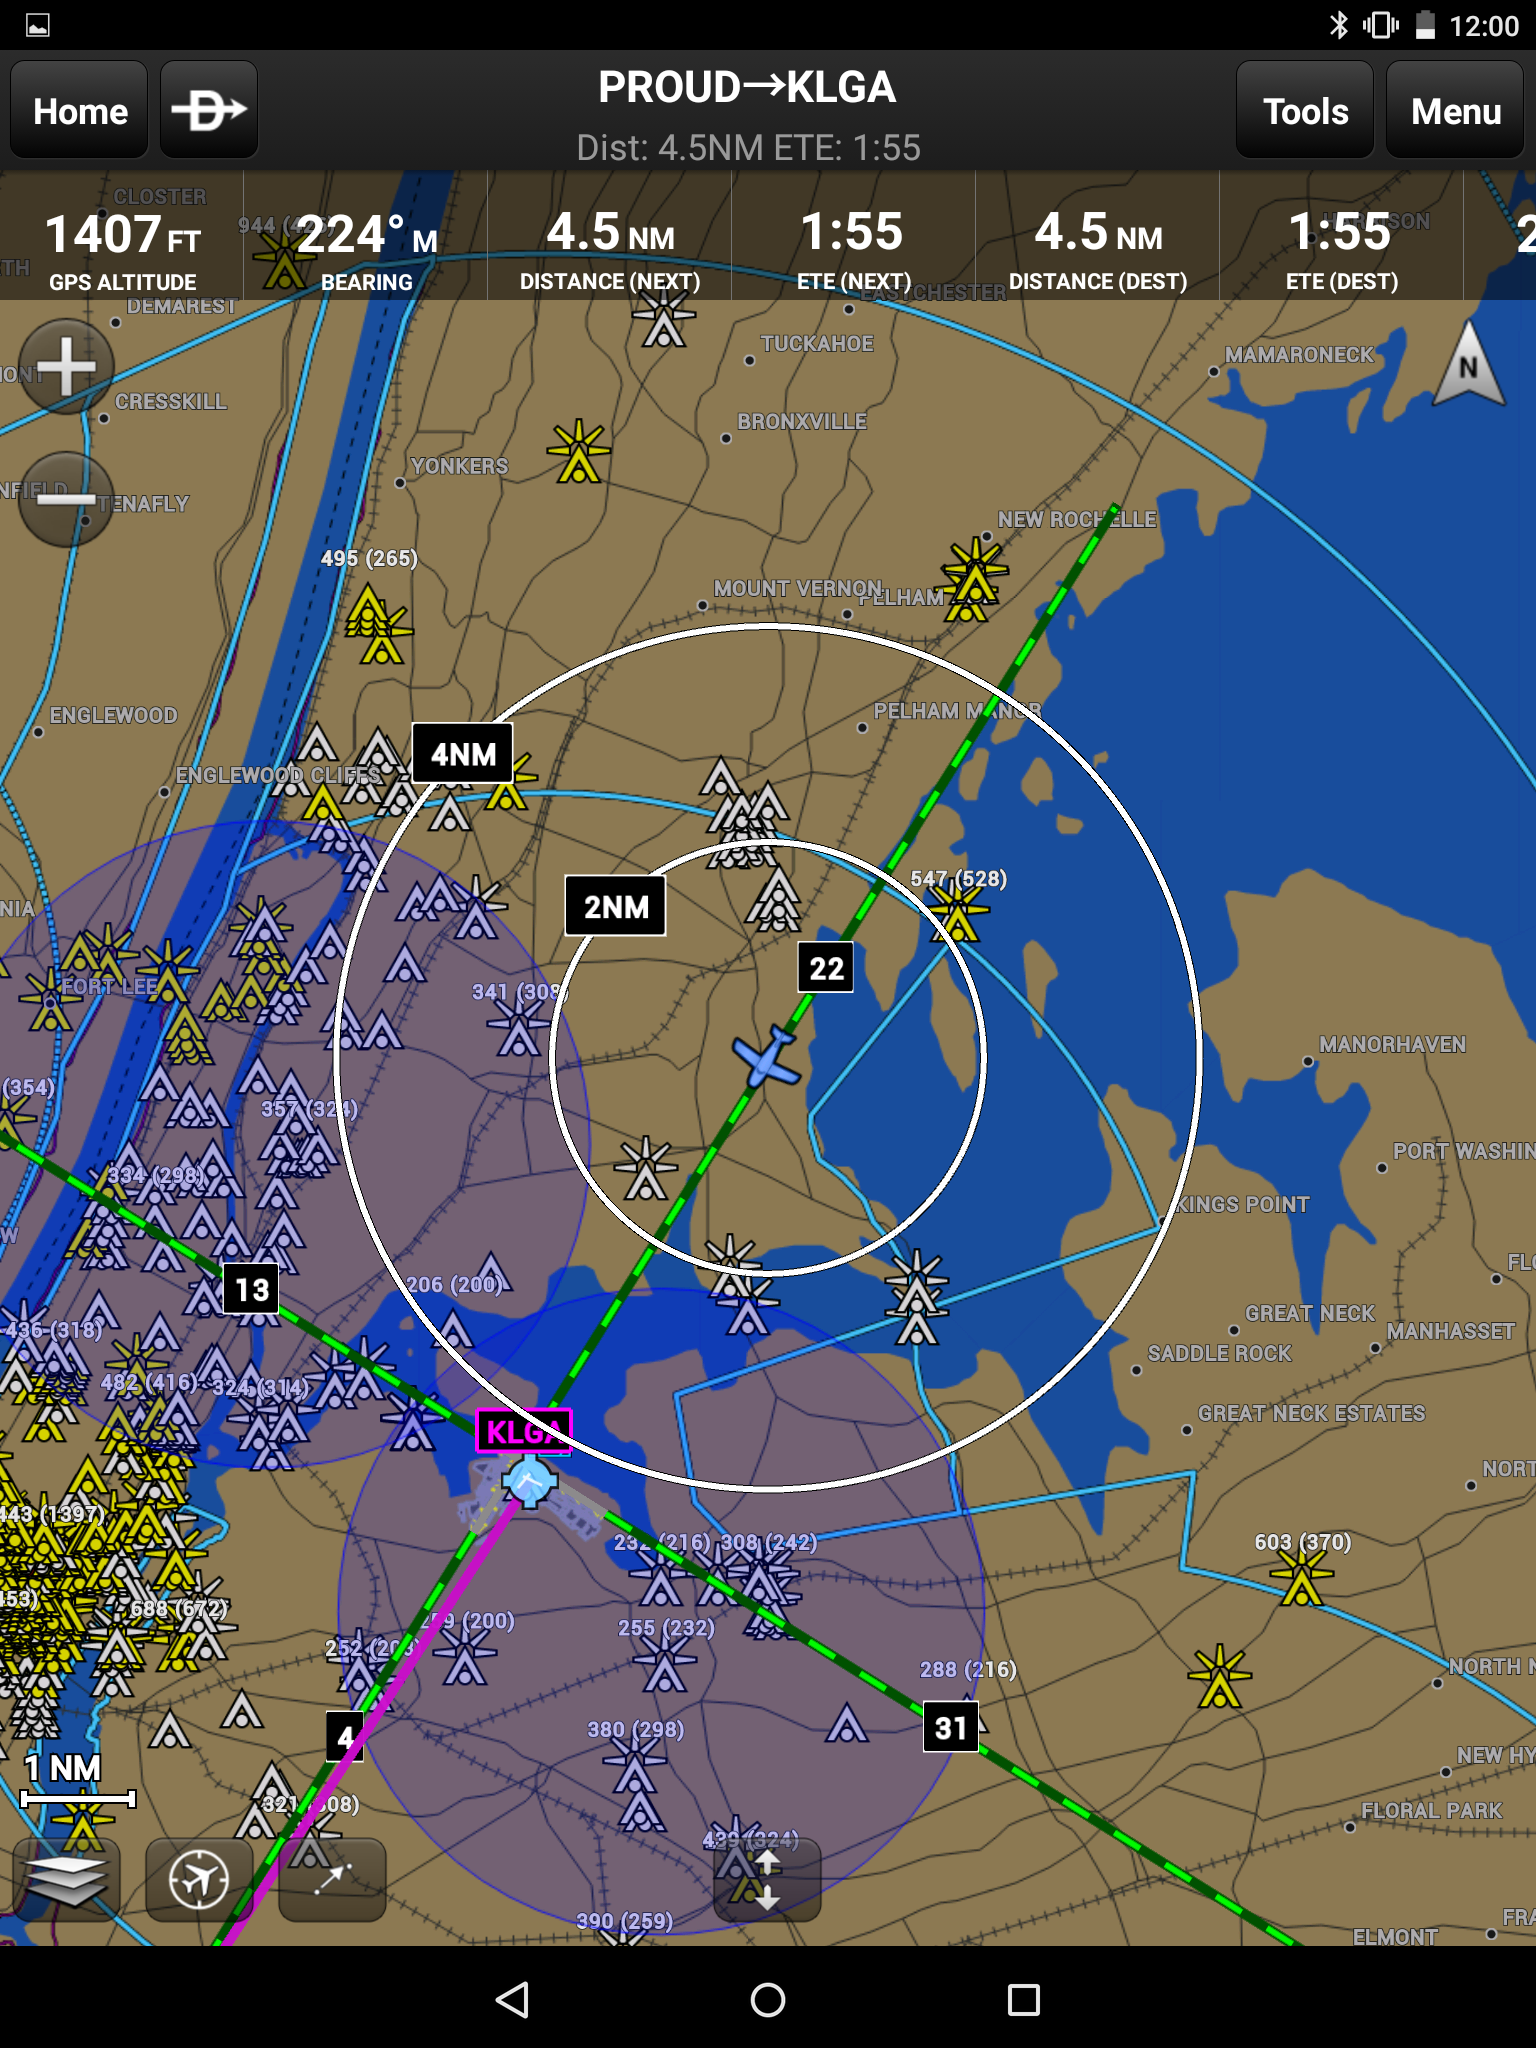
Also available on that main map page are two features that were added in June of 2015: terrain and obstacles. You can set the app to display the obstacles around your location, which will include information about their altitude as well as whether they are lighted. The best part isn’t that they simply stay there and stationary, but they change color with context. White obstacles are no factor, yellow obstacles are close to your altitude, and red obstacles are roughly eye level with you. And if you get too close the app will let you know.
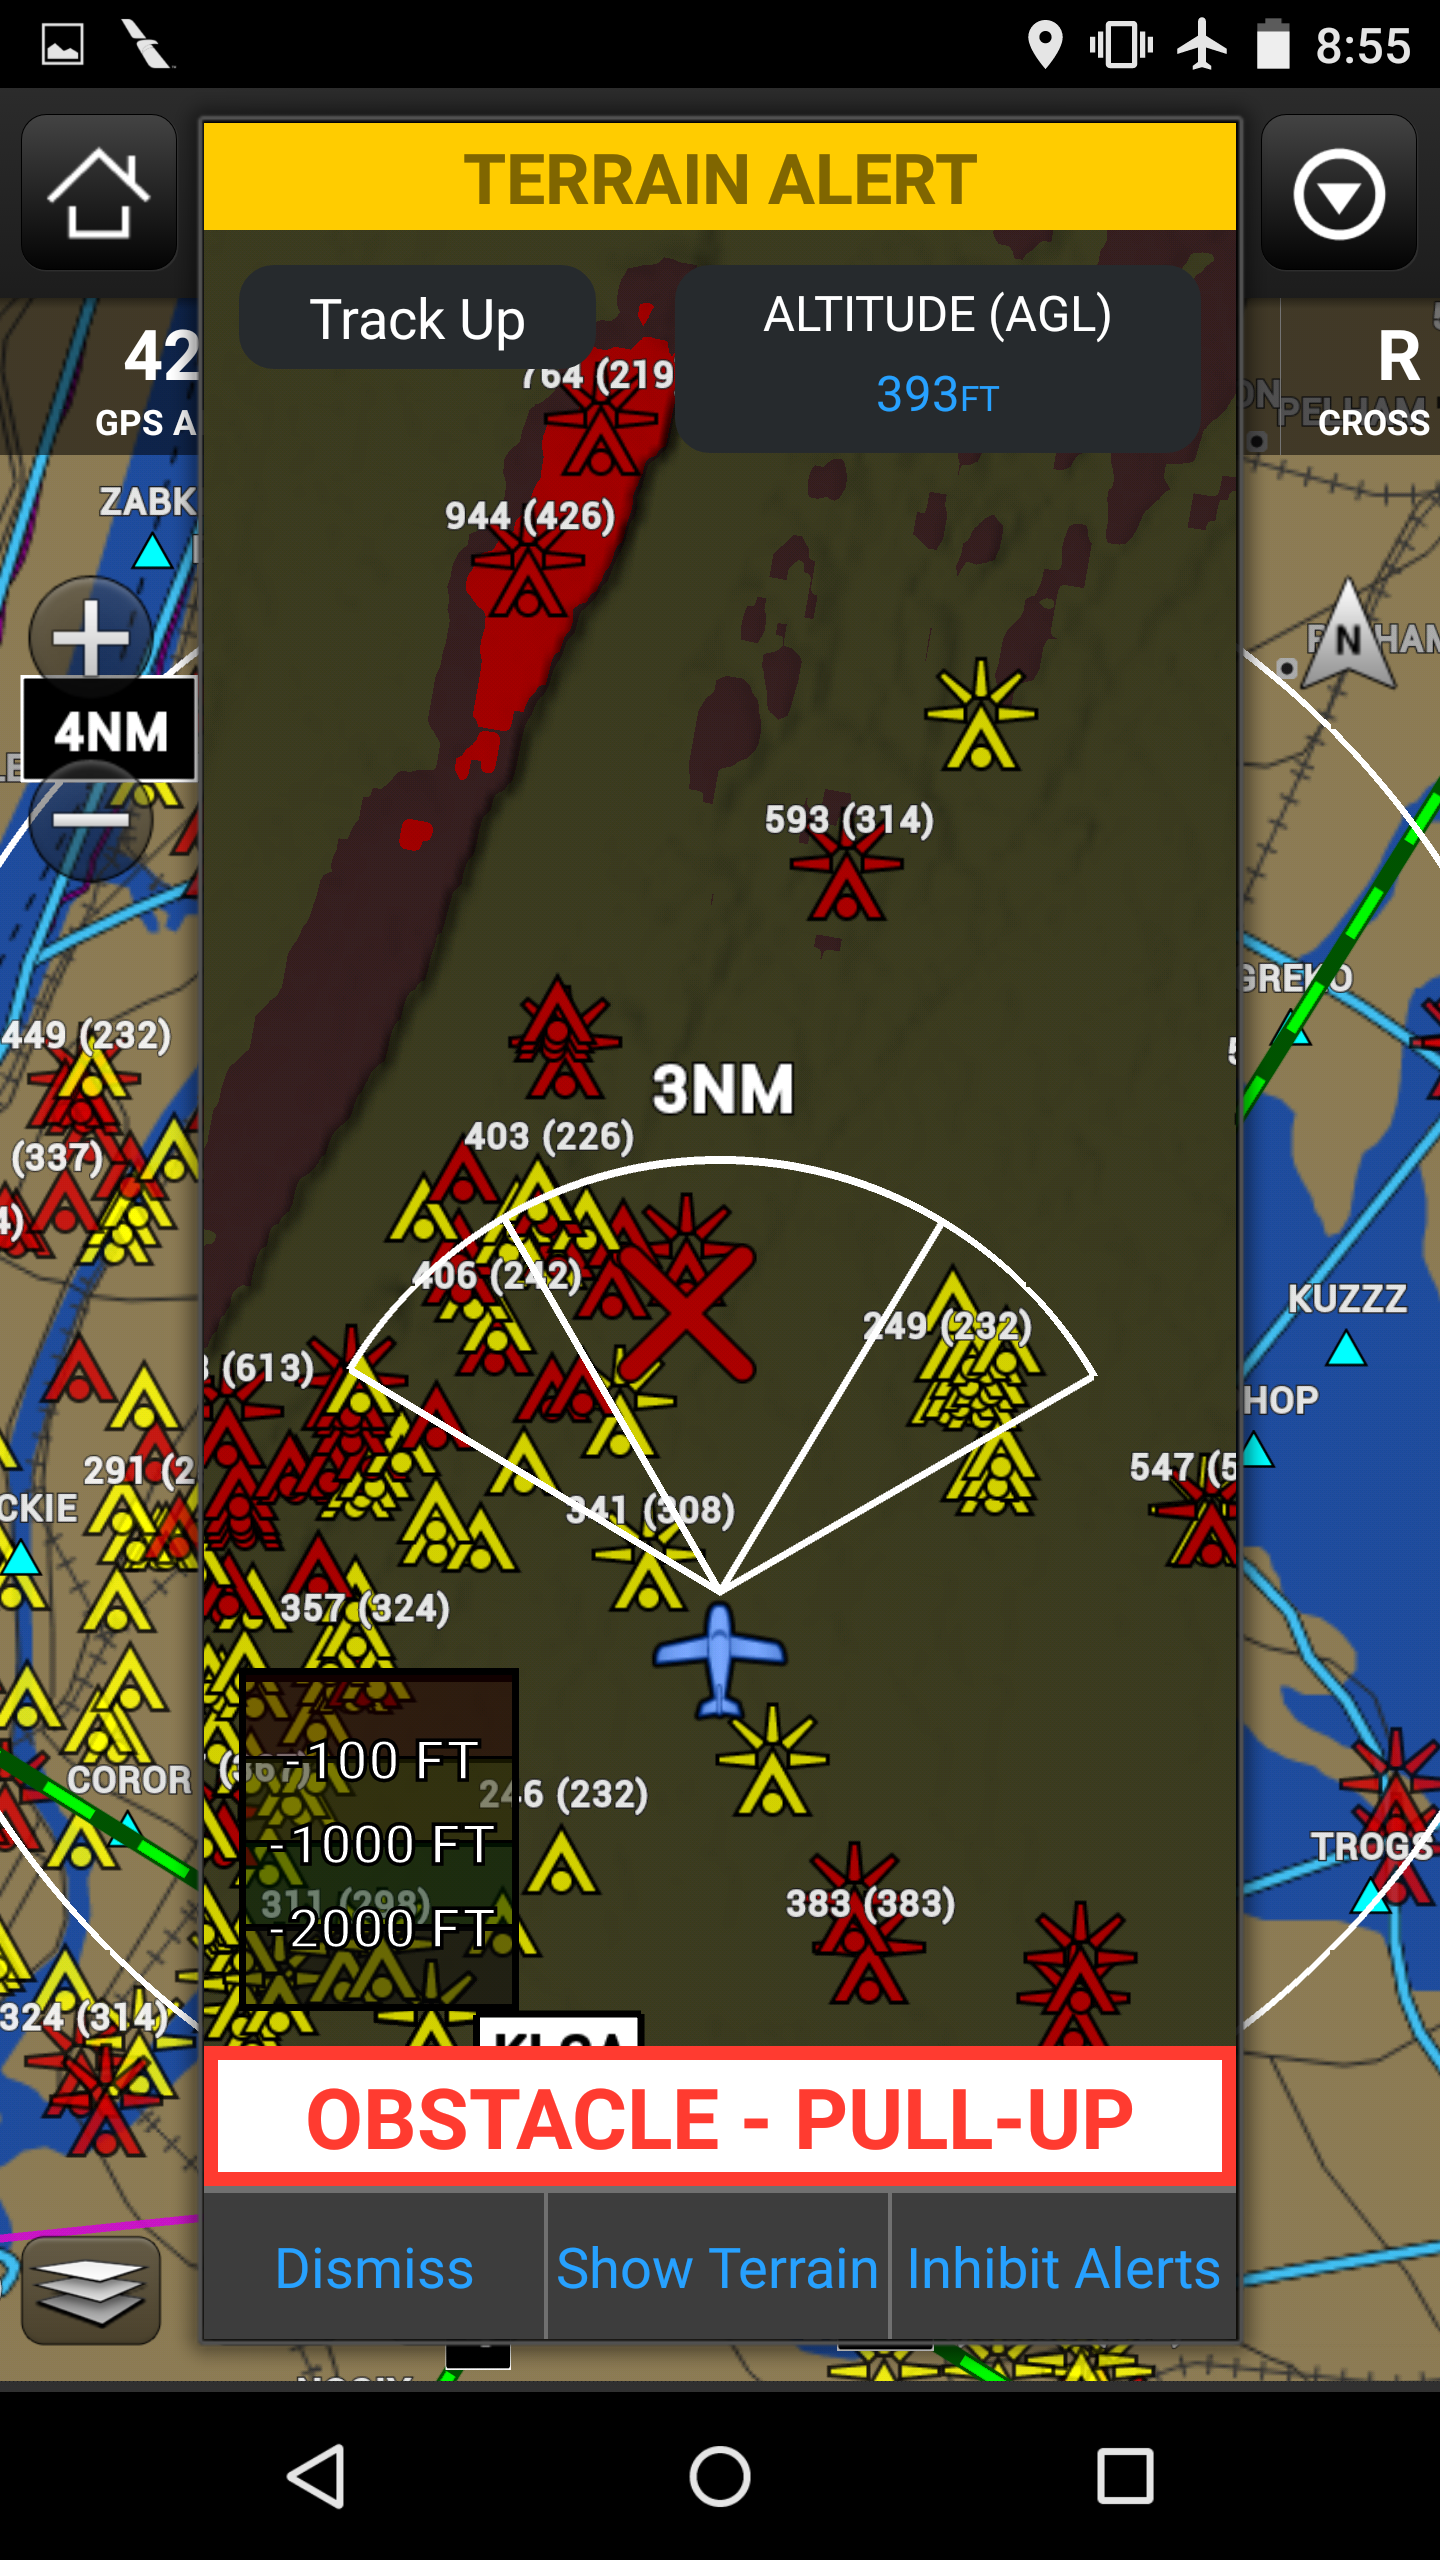
The update for obstacles also included an update for terrain, so that flat map is no longer quite so flat. This is one of the first baby steps to getting the same synthetic vision flight system available for iPad ported over to the Android environment, and while it has taken some time to get to this point it looks like they aren’t launching anything before it’s ready. The terrain shows up as a background image on the Garmin VFR and IFR charts, and can turn different colors on the “Terrain” tab depending on your altitude just like a Garmin 400.
Automatic warnings for terrain as well as obstacles are included, so if you’re within 3 NM of an obstacle or a terrain feature it will let you know with a gentle reminder. These alerts can be inhibited, so if you’re making an approach and there’s a hill on the other side of the runway you can tell the app to shut up and let you read your chart in peace.
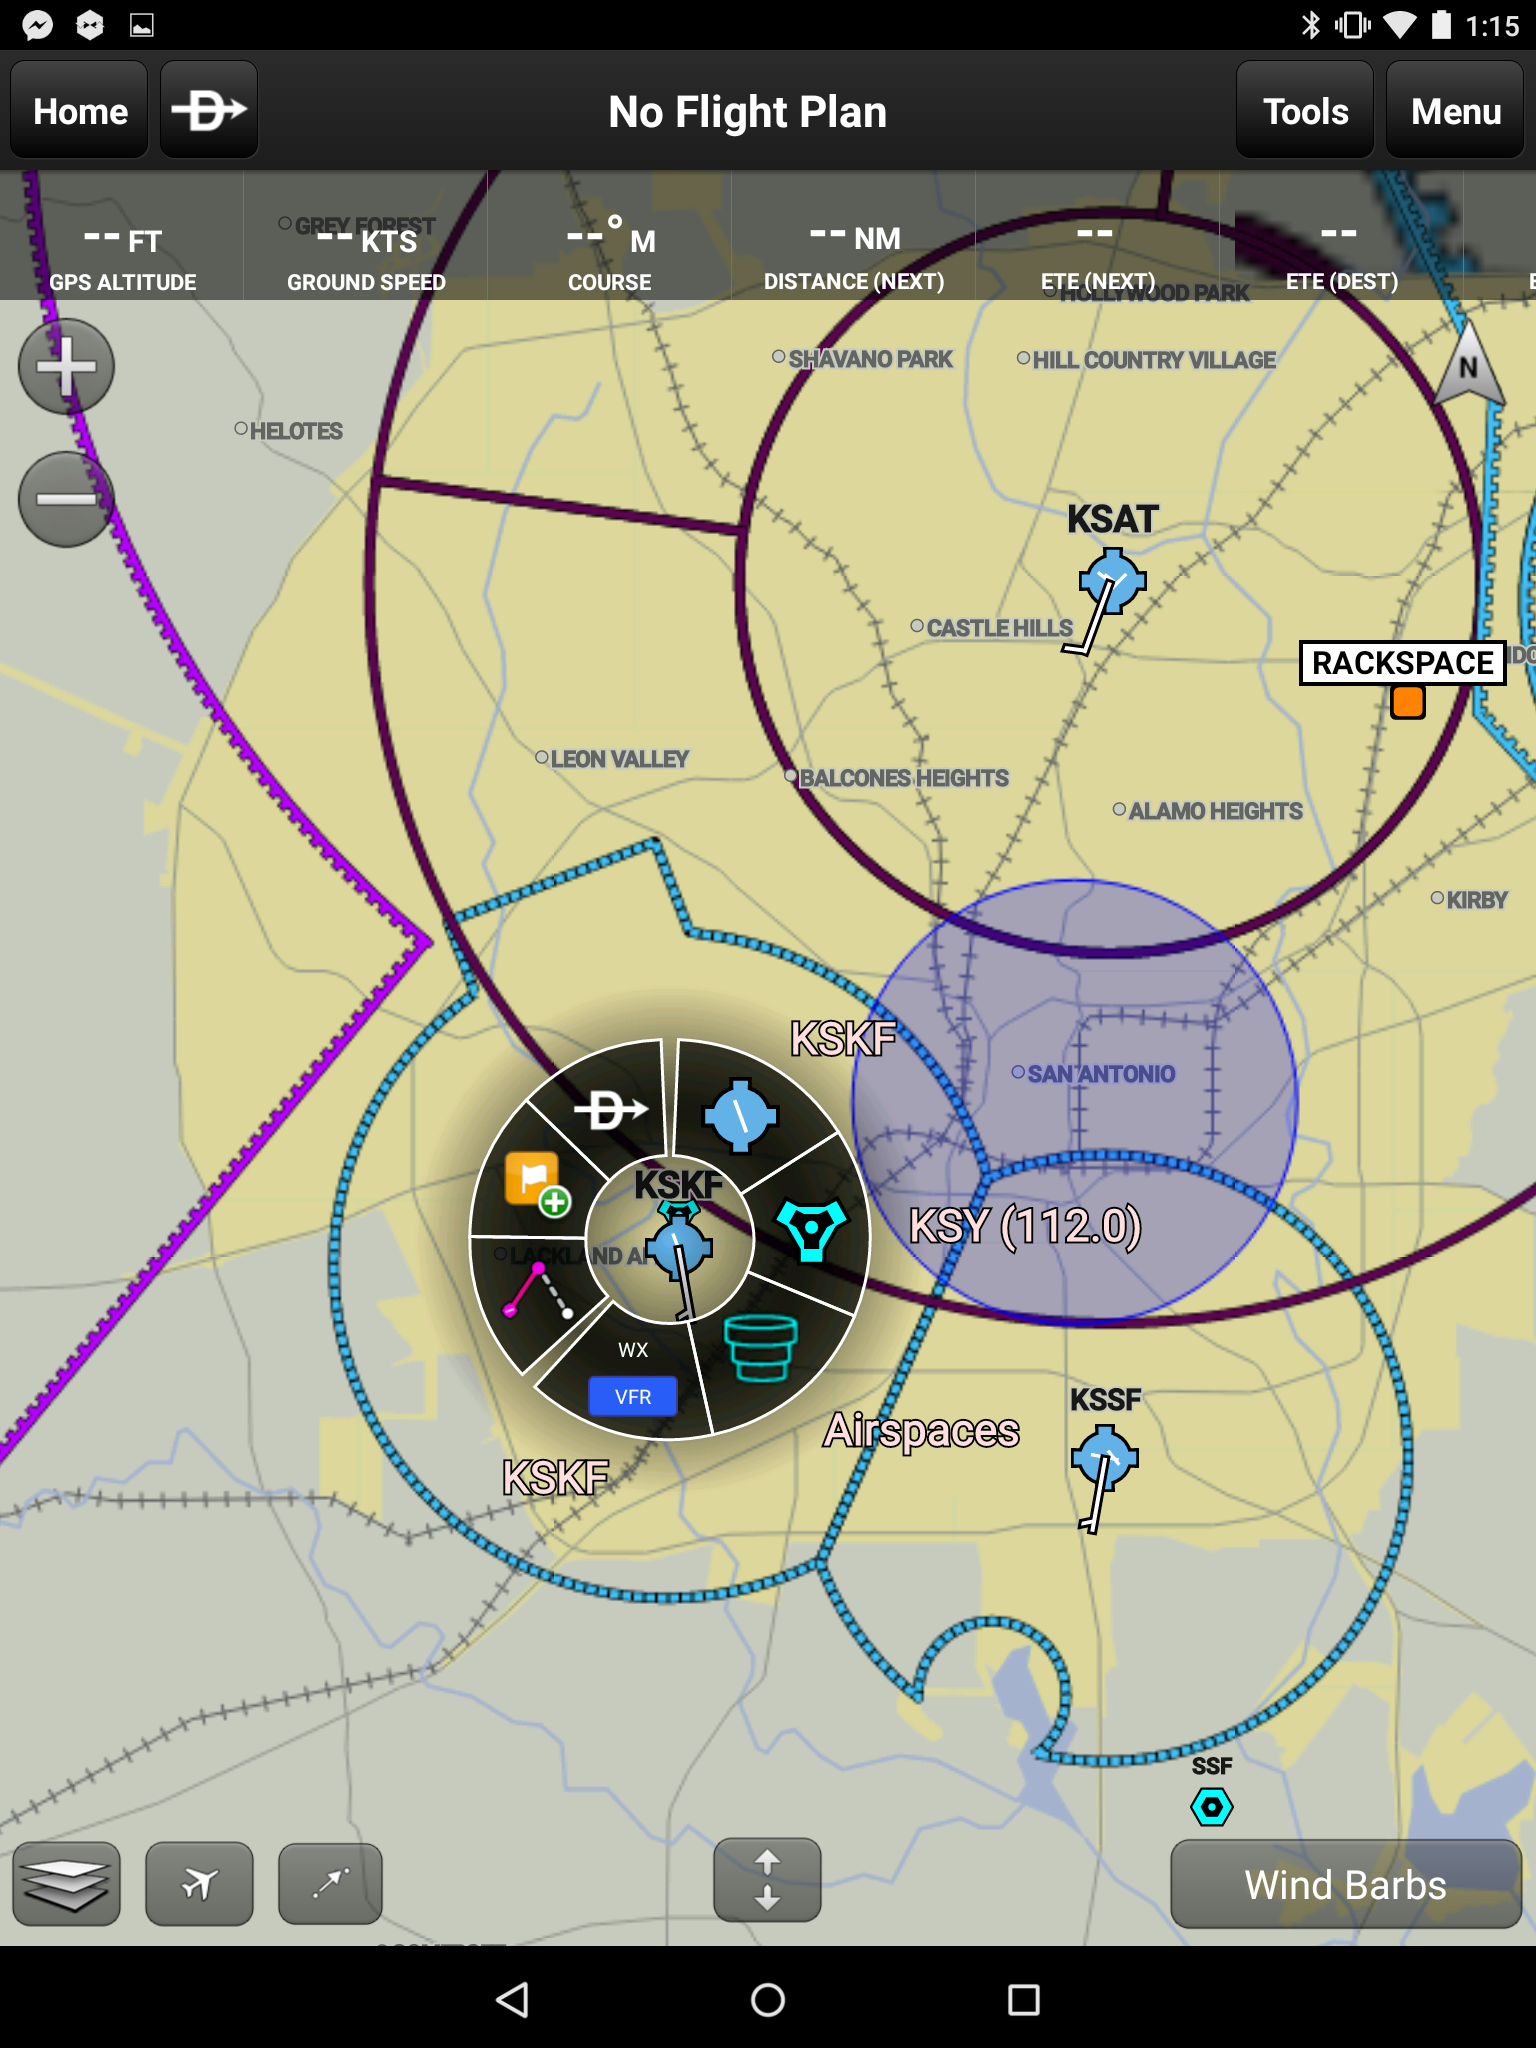
One feature that really stands out on this page is the one-tap access to anything you want. If there’s something on the map you want to check out, just give it a tap and GP will pop up with a context based menu around that specific point. The first three options on the left are all about immediate navigation — a dedicated “direct to” button, an “add waypoint” button, and a “change flight path” button for editing your flight plan literally on the fly.
There are context based readouts for other situations of things you may click. For VORs, it will list the frequency right on that menu no additional fussing required. If you clicked on a TFR, it will give you an option to see what the TFR is about and the details surrounding it on a small pop-up on that same page. There’s a dedicated “airspaces” button that will play the rocket game with you and list all of the relevant airspace under that specific point in a similarly smart pop-up box. And for airports, there are two options — a weather button that brings up the latest weather on record for that station, and an airport button that can get you all the info you could want.
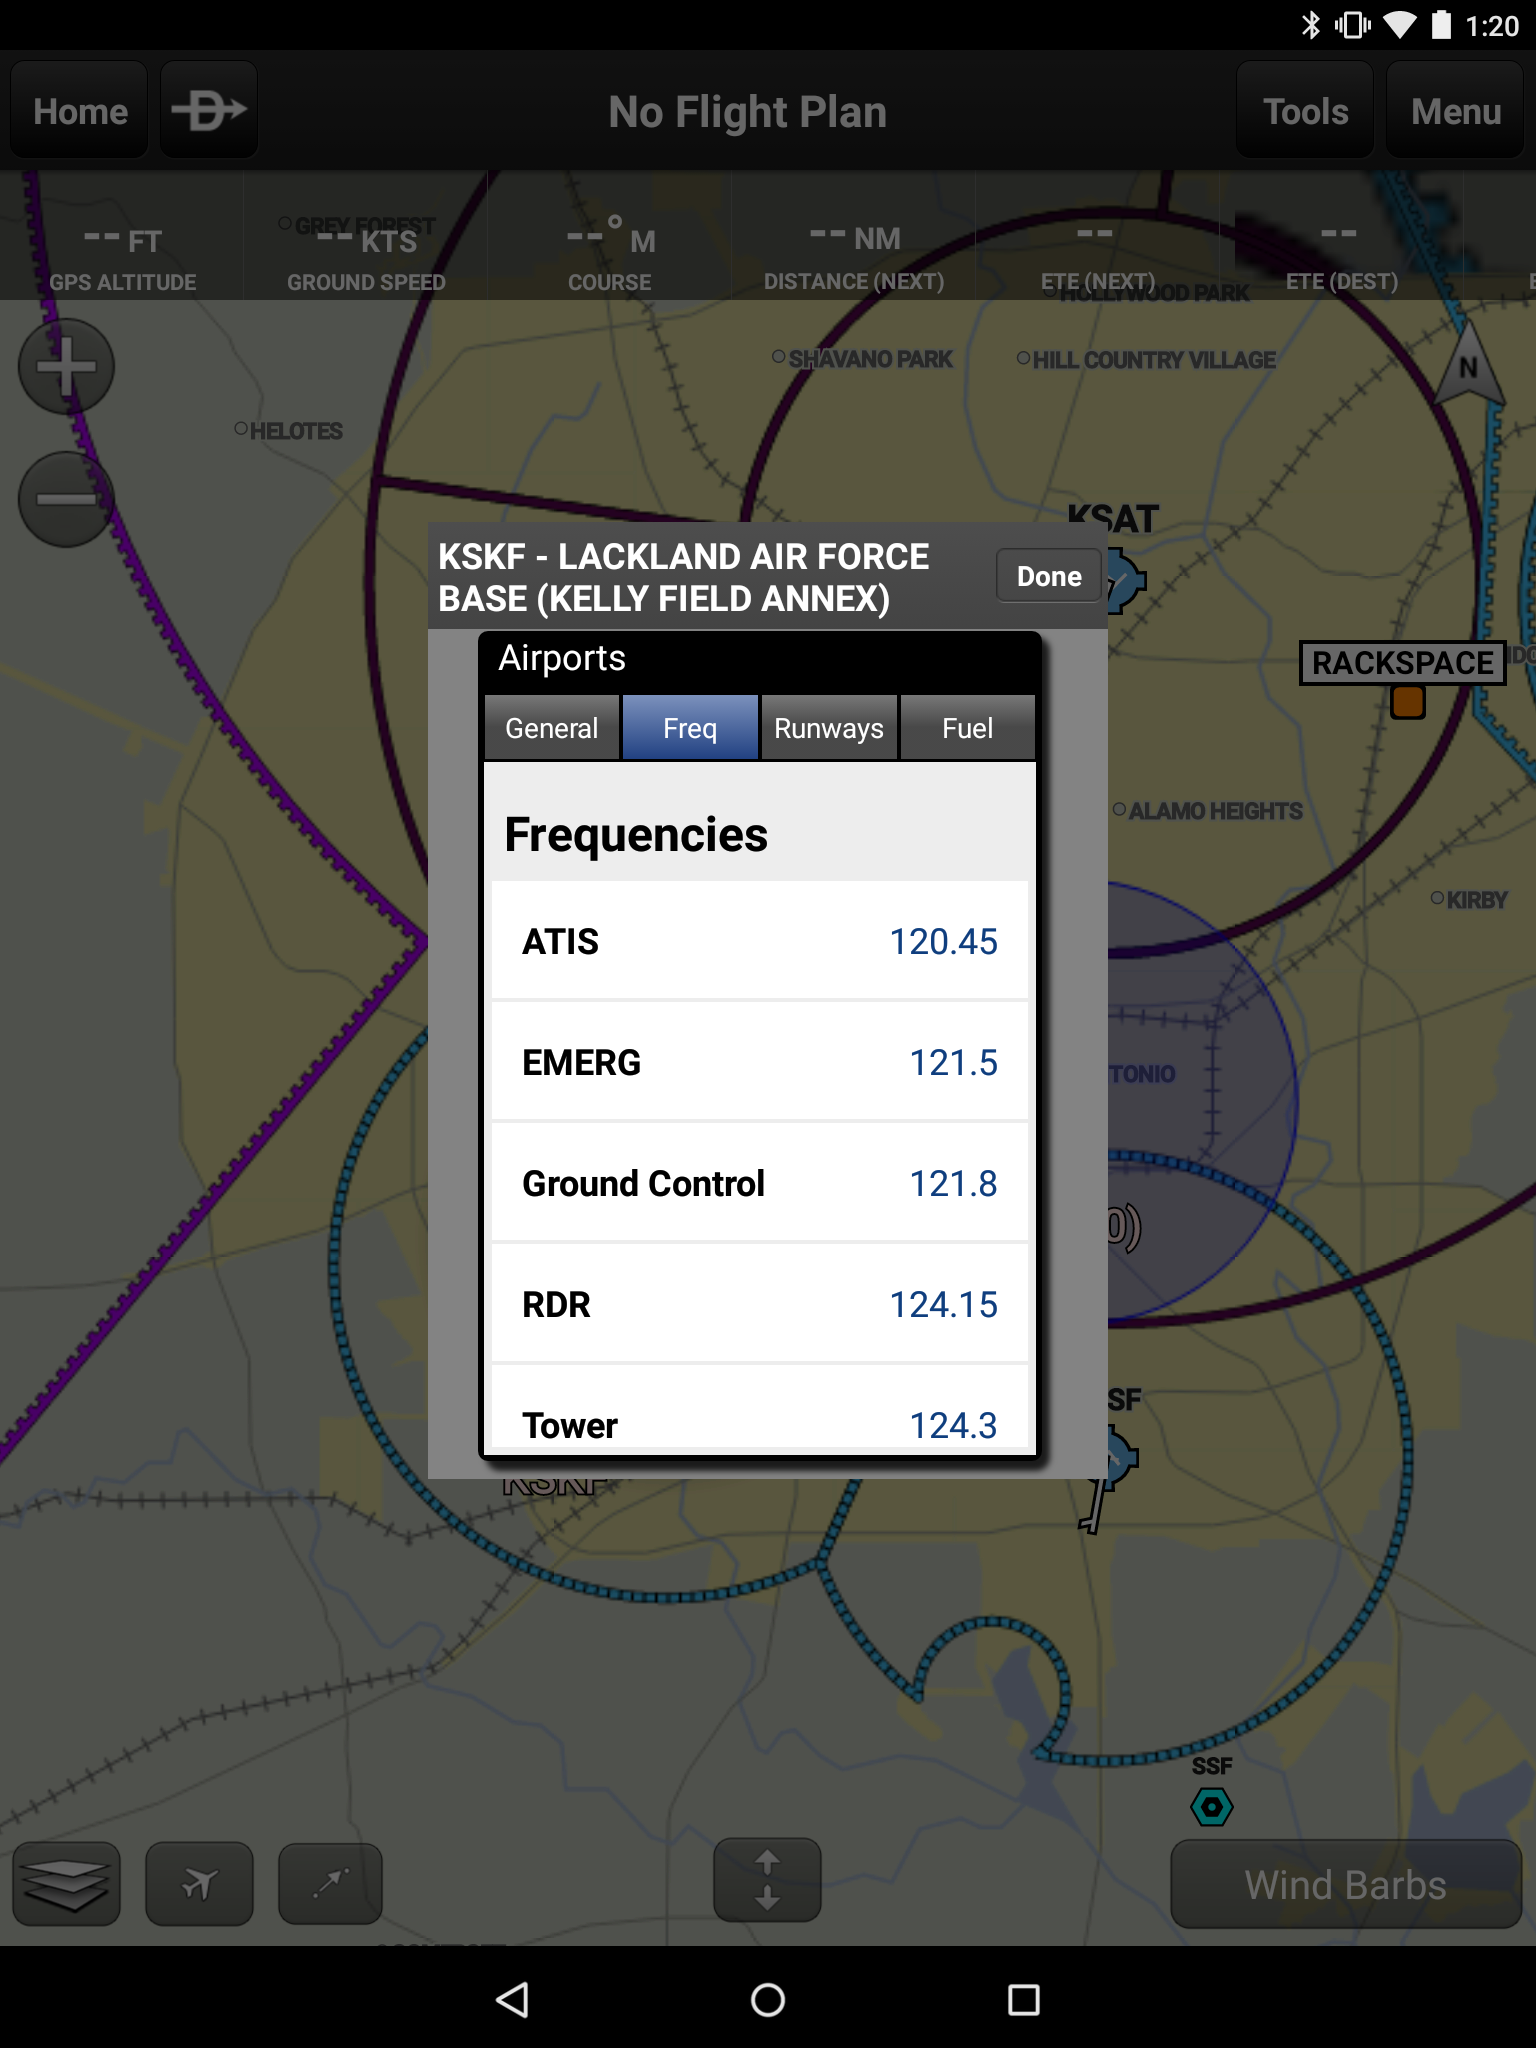
For both the weather and airport buttons, it doesn’t switch away from the main moving map — it simply pops up a helpful little info box with the required information. For the weather, it presents the latest METAR and TAF (either in Zulu or local depending on your preference). With the airport information, it gives you everything you would need to know if you were going to divert there for an emergency. It provides runway lengths, communications frequencies, field elevation, hours of operation, and much more.
A few weeks ago, I took my first passenger up for a ride around San Antonio. Things didn’t go as planned, and we needed to quickly divert to a nearby airport. Using only that pop-up menu that appeared when I clicked on the airport, I was able to get all the information I needed to contact the airport and safely land without any incident. Everything was right there at my fingertips, even though I hadn’t written any of that information down on my kneeboard beforehand. If I didn’t have the Garmin Pilot app, I would have been kinda screwed.
But if that still isn’t enough, there’s a button at the bottom marked “MORE INFORMATION” that brings you to the proper airport page and leaves the moving map behind.
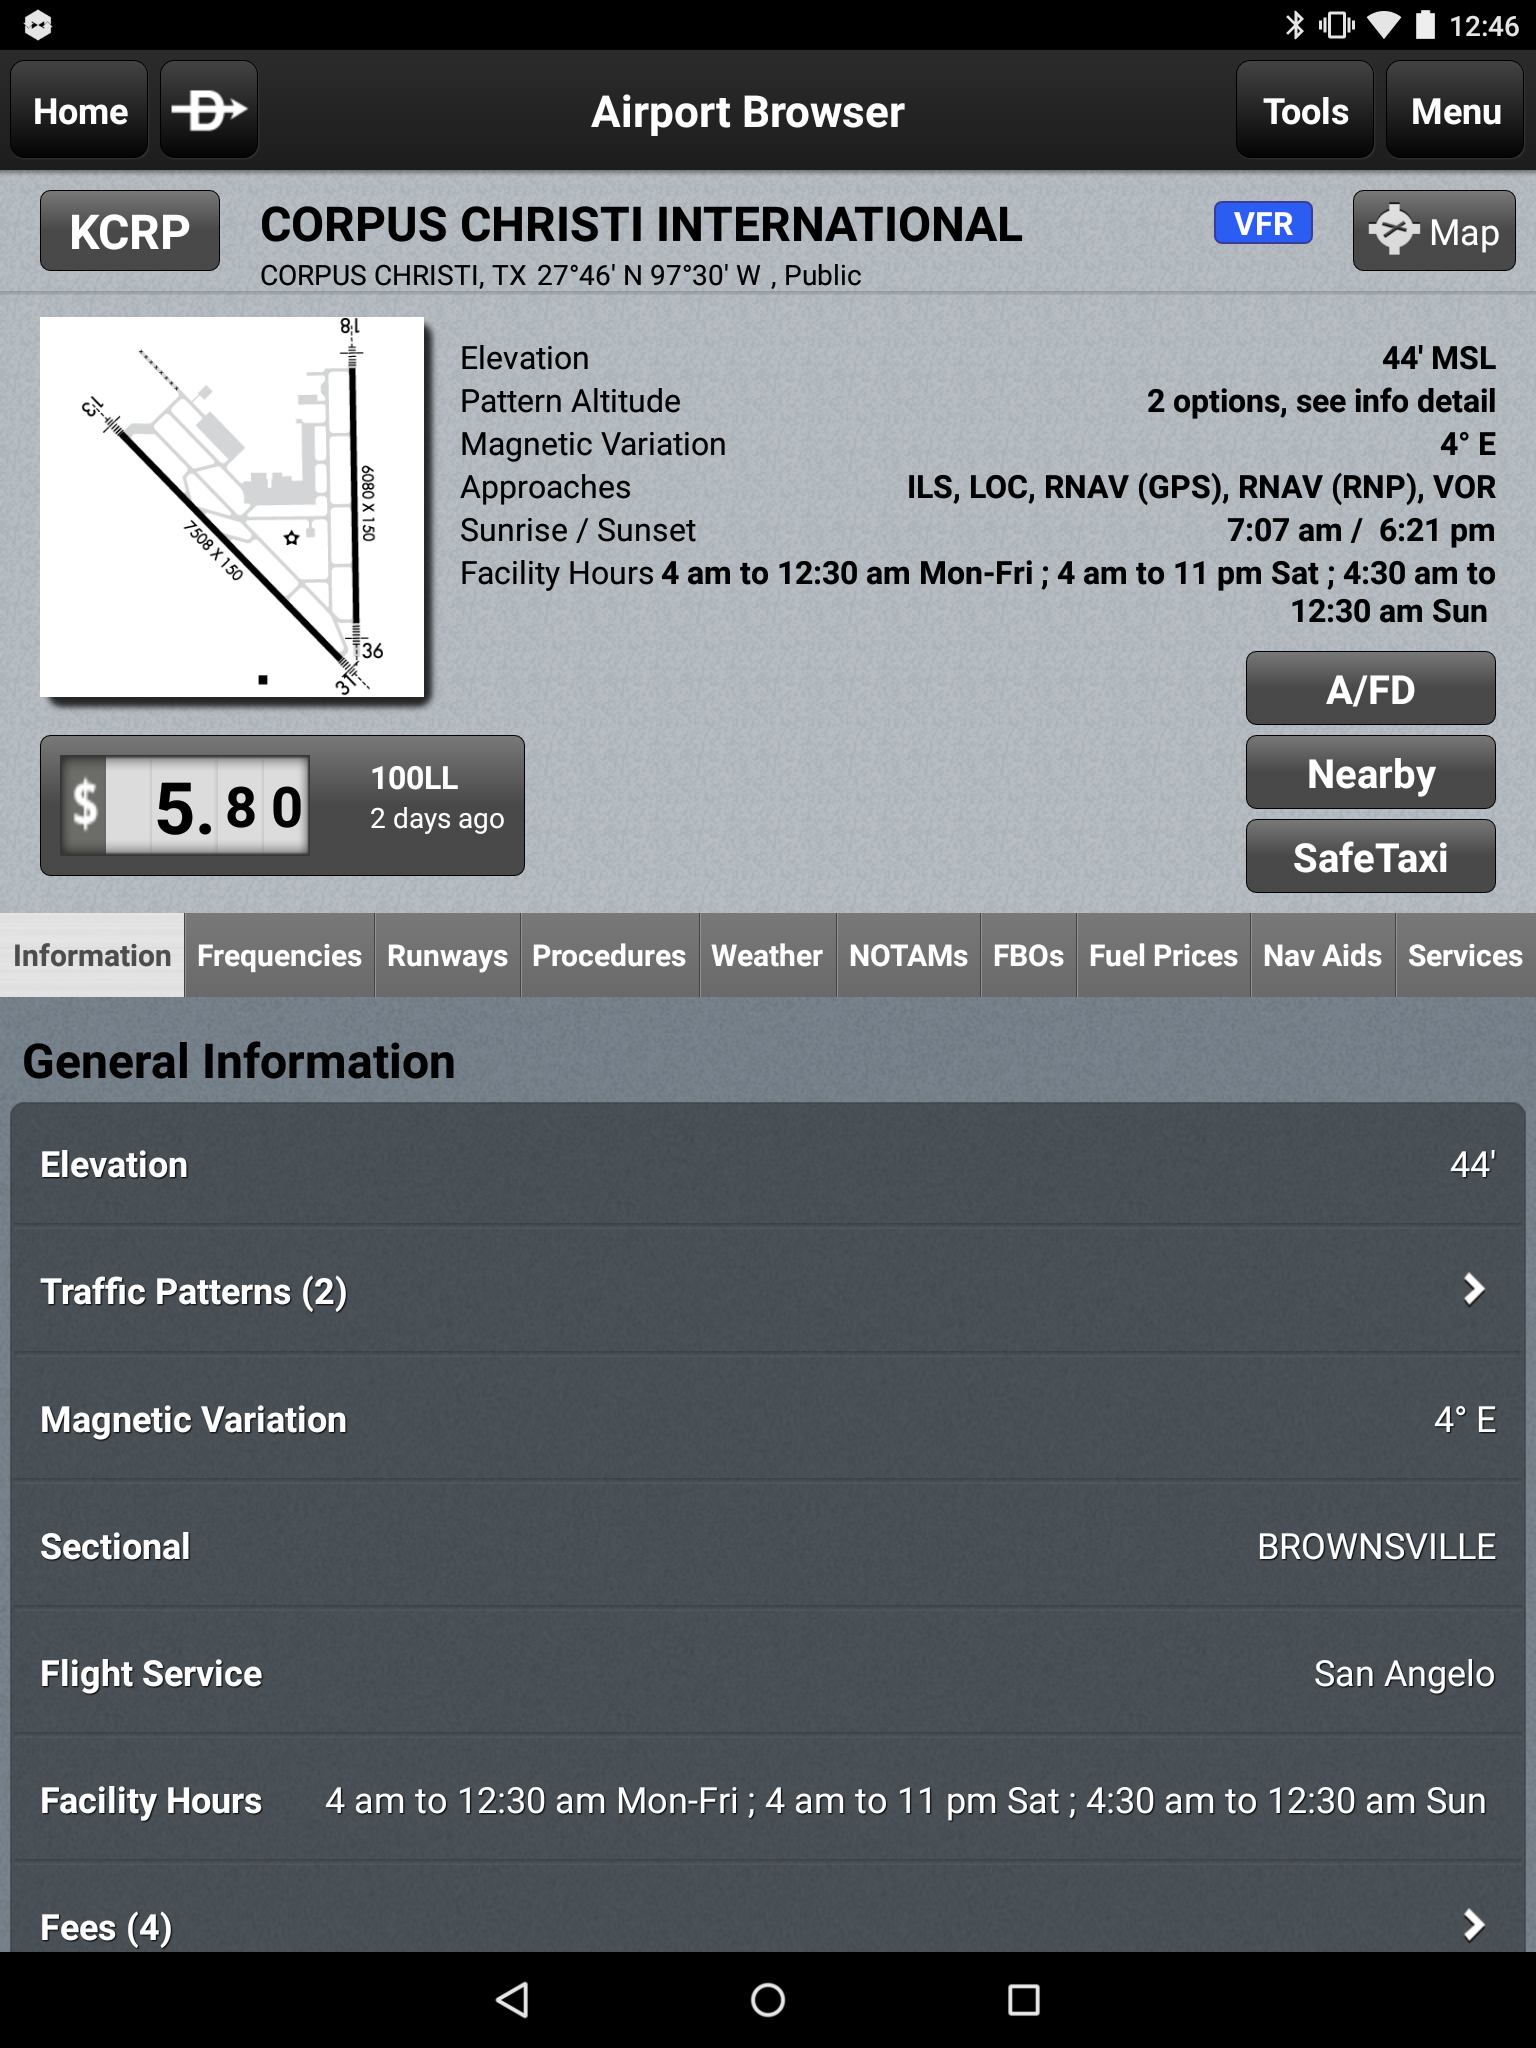
On the main airport page, there’s a deluge of information available. The top left will have a generic airport diagram if available, and for a more detailed map of the airport there’s a proper airport diagram on the “Procedures” tab along with any arrival procedures, departures, and instrument approaches. The “Runways” tab will have detailed information about the size and condition of each runway, along with a visual representation of its orientation (I found that extremely useful when heading into a new airport recently). There’s also information about NOTAMs for the field, weather, available FBOs, and even latest reported fuel prices.
GP’s airport database is fed from the AOPA’s facilities directory rather than the FAA directory, which is something to keep in mind when browsing the information, but there’s a clickable link on the page for a stored PDF version of the relevant page from the official A/FD.
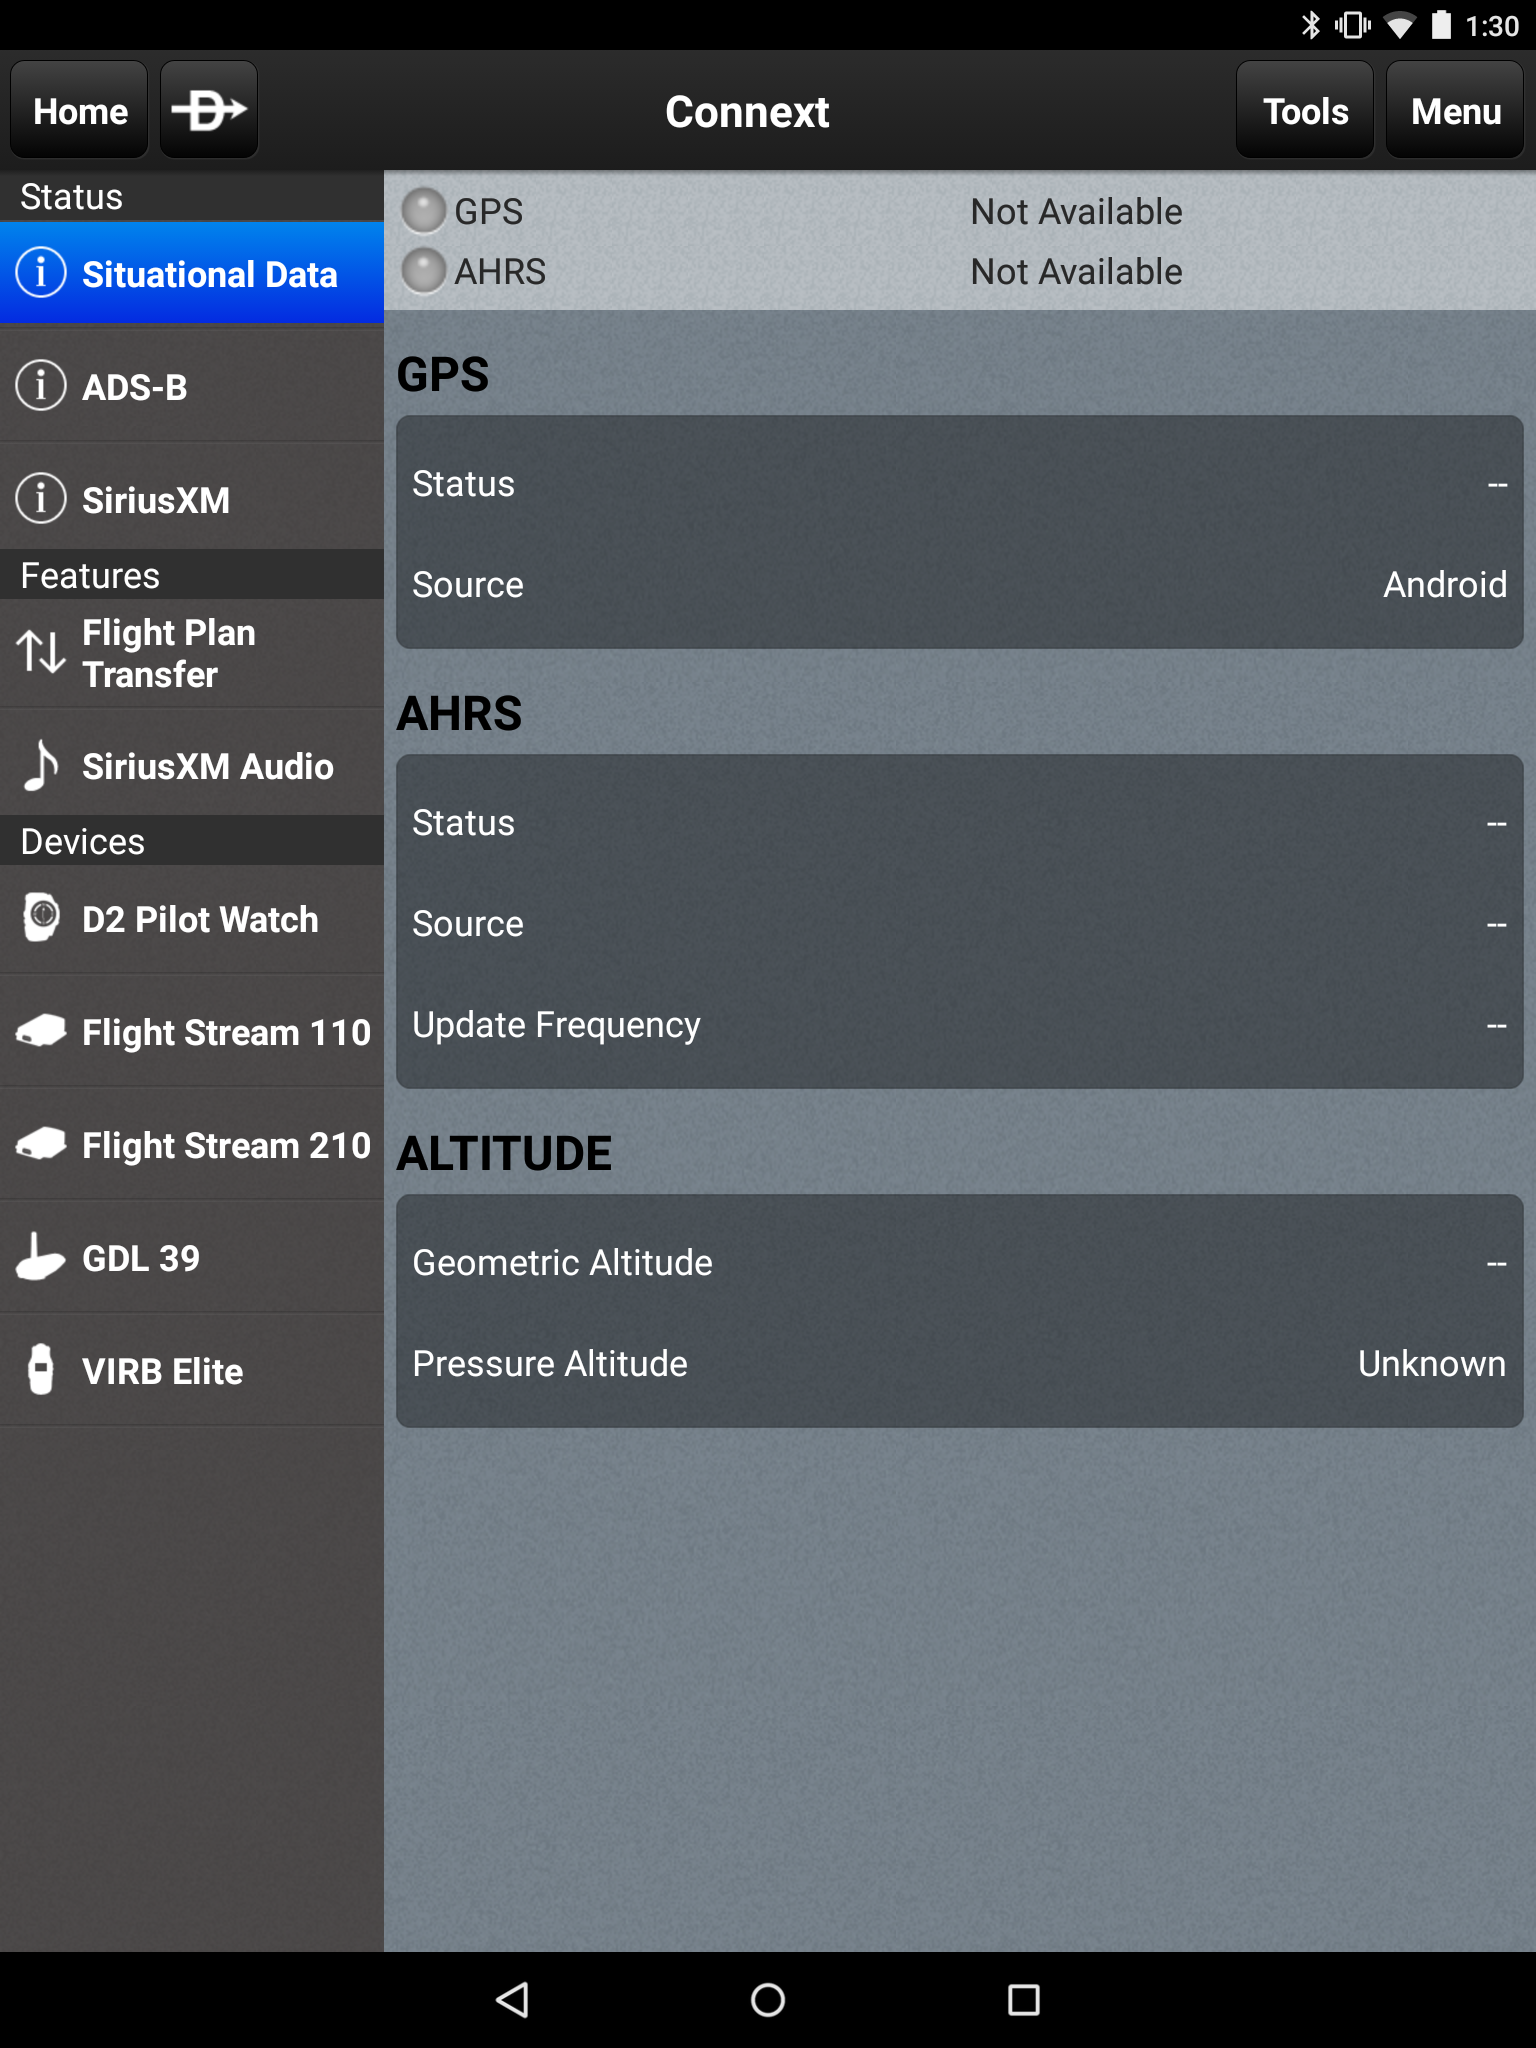
The biggest problem is getting the app connected to other devices. Since this is Garmin we’re talking about, they really want to push their own devices rather than allow the app to inter-connect with anyone else’s kit. Rather than letting it work with other ADS-B receivers like Dual Electronics’ XGPS170, the Garmin Pilot app only works with the $875 MSRP battery-free Garmin GDL 39. There are some things it plays nice with however, like my Dual Electronics XGPS150A Bluetooth GPS. The problem with using a tablet in a Cessna is that the wing is directly overhead, and getting a good signal isn’t always possible. Throwing a remote GPS receiver on the glare shield solves that problem nicely.
If you get the Garmin gear, though, it works. For example, the VIRB Elite camera — once connected — has a live stream straight on the app so you can see what it sees and set it recording remotely. For example, if you stuck it to your rudder and can’t quite reach it in flight to push record.
[UPDATE 6/14] Garmin just released version 4.3 with some major improvements. Click here for the rundown on terrain, obstacles, and X-Plane 10 integration.
SUMMARY
I have a bit of a love-hate relationship with Garmin Pilot. There are some things that they are doing great, and some simple stuff that seems to be slipping through the cracks. Prime example was the latest Android software update — the app was completely incompatible with the latest version of Android, and it took nearly a month for them to fix it. Apple products never have that issue, but then Apple products are the work of the Great Satan. Just last week their app stopped working with the payment processing system, meaning I couldn’t renew my subscription. And the gripes continue — the app should be able to sync up with your online Garmin Pilot profile, to allow syncing flight plans and easier on-line trip planning. But it doesn’t, your Garmin Pilot app login information is a completely different account still. And it doesn’t seem to be a priority.
Garmin Pilot seems to be way down on the totem pole at Garmin. Updates are pretty sluggish when things break, and new features appear about as often as Jesus Christ on pieces of toast in Florida — not too often, but often enough to be notable. I’d wager that there’s a guy named Sergey locked in a back room being fed a steady stream of Mountain Dew and Skittles developing this thing all on his own.
Despite the gripes, the system undoubtedly works. It has never crashed (when it works), it always has the latest charts, and the graphical user interface for the app is laid out in a manner which pleases me. It has beaten out all the competitors on the Android platform in my opinion, and is simply the best on the market for that device. ForeFlight has been making some noise about moving over into the Android world, and if they ever do I’d love to see the competition. Until then, back to Garmin Pilot.
FYI – After you create a flight plan on the ‘Trip Planning’ page you can get that flight to appear on the main map by clicking the Menu button (or maybe it is the Tools button…I don’t have my tablet with me so I can’t confirm which it is since all I get on my phone is a button with a down arrow) and selecting ‘Activate Flight Plan’. That moves everything over to the map page and even adds it to the ‘Flight Plan’ page.
Help me! For the past couple of years I have been using a Nexus 7 to run Garmin Pilot. I use it in conjunction with a GDL-39 for GPS and weather via blue tooth. The set up worked great until my Nexus 7 was destroyed after an emergency landing, which is a whole different story.
I decided to replace it with an updated devise. A quick web search resulted in an article that stated the Nexus 9 is the way to go. I bought one and promptly loaded Garmin Pilot. Then I attempted to pair it with my GDL-39 and started to have trouble. My Nexus recognized and paired quite easily with it. Then I went to the “connect,” feature in the program. It showed the number of my GDL but when I pushed the “connect,” button nothing happened. It quickly stated not connected.
The next day I was out to the airport still trying to connect. A friend of mine was there with his ipad. I told him of the trouble I was having and he tried to connect my GDL-39 to his devise. It worked instantly. Huh.
The next day I spent a little over an hour on hold trying to connect to Garmin support. I was on the treadmill when my wife hollered down to me that they finally picked up. I spent the next half hour talking to a very nice man going over all of the instructions the program described for pairing a devise. We tried everything over a least twice. One point of interest is the method described in the program for clearing paired devises on the GDL-39. It said to hold the power button down until the the blue light starts flashing. Then it says to release the power button and then push and hold it again for 5 seconds. Good enough. The next step is not quite so clear, it says to hold the button for another 5 seconds and then power off. Does that mean to remove the power while still holding the power button or, release the button and then power off? I asked the tech rep and he agreed it was ambiguous but in addition to that he said the blue light should stop flashing because of this. Mine didn’t but this part was not even in the instructions.
At any rate, after all of this the bottom line according to him is that I was SOL and would have to wait for an update to the software when Garmin when they get around to it. Another interesting note is that he wanted me to try and update the firmware on the GDL-39 but this is not possible if you cannot pair with the computer.
So I am asking, has anyone experienced this? Am I the only one with a Nexus 9 that can’t connect to a GDL-39? Can anybody help me?
So… Garmin gets all the maps from the FAA, FREE, then charges you a Annual Fee to tweak them so you can use them ? Makes you not want to buy Garmin Products.
Exactly. Costs a fortune to buy your updates from Garmin, that you already paid for. I use Avare for most of my flying. Free updates. GRT ? Free updates. Dynon ? Free ! Garmin ? Pay through the nose for the equipment, then get bent over for the updates that you already paid for via your taxes. Unfortunatly , Avare does not yet speak Garminese for ADSB traffick. Hopefully soon.
Ive got TAC charts downloaded, but for the life of me, I can’t find a way to view them. Anyone else have this issue?